报告仓库:dekrt/Reports:
HUST SSE Courses Reports | 华科软件学院课程报告 (github.com)
《操作系统原理》实验报告(一)
姓名
dekrt
学号
U2021172??
专业班级
软件2102班
时间
2023.03.13
一、实验目的
1)理解操作系统引导程序/BIOS/MBR的概念和作用;
2)理解并应用操作系统生成的概念和过程;
3)理解并应用操作系统操作界面,系统调用概念
4)掌握和推广国产操作系统(推荐银河麒麟或优麒麟,建议)
二、实验内容
1)用NASM编写MBR引导程序,在BOCHS虚拟机中测试。
2)在Linux(建议Ubuntu或银河麒麟或优麒麟)下裁剪和编译Linux内核,并启用
新内核。(其他发行版本也可以)
3)为Linux内核(建议Ubuntu或银河麒麟或优麒麟)增加2个系统调用,并启用
新的内核,并编写应用程序测试。(其他发行版本也可以)
4)在Linux (建议Ubuntu或银河麒麟或优麒麟) 或Windows下,编写脚本或批
处理。脚本参数1个:指定目录。脚本的作用是把指定目录中的全部文件的文件名
加后缀,后缀是执行脚本时的日期和时分。例如:文件名“test”变成“test2023-03-14-20-42”
三、实验环境和核心代码
3.1 用NASM编写MBR引导程序
开发环境:Ubuntu 20.04,内核版本:5.15.67,编辑工具:vim &
gedit
首先,安装bochs、bochs和nasm
安装 bochs 、bocshs与 nasm
1
2
3
sudo apt-get install bochs sudo apt-get install bochs-x sudo apt-get install nasm
编写 boot.asm ,命令如图
image-20230712115144181
文件内容如下
1
2
3
4
5
6
7
8
9
10
11
12
13
14
15
16
17
18
org 07c00h mov ax, cs mov ds, ax mov es, ax call DispStr jmp $ DispStr: mov ax, BootMessage mov bp, ax mov cx, 16 mov ax, 01301h mov bx, 000ch mov dl, 0 int 10h ret BootMessage: db "Hello, OS world!" times 510-($-$$) db 0 dw 0xaa55
编译boot.asm
1 nasm boot.asm -o boot.bins
创建镜像文件
进行如下操作
1
2
3
4
5
6
7
8
9
10
11
12
13
14
15
16
17
18
19
20
21
22
23
24
25
26
27
28
29
30
31
32
33
======================================================================== bximage Disk Image Creation / Conversion / Resize and Commit Tool for Bochs $Id: bximage.cc 14091 2021-01-30 17:37:42Z sshwarts $ ======================================================================== 1. Create new floppy or hard disk image 2. Convert hard disk image to other format (mode) 3. Resize hard disk image 4. Commit 'undoable' redolog to base image 5. Disk image info 0. Quit Please choose one [0] 1 Create image Do you want to create a floppy disk image or a hard disk image? Please type hd or fd. [hd] fd Choose the size of floppy disk image to create. Please type 160k, 180k, 320k, 360k, 720k, 1.2M, 1.44M, 1.68M, 1.72M, or 2.88M. [1.44M] What should be the name of the image? [a.img] Creating floppy image 'a.img' with 2880 sectors The following line should appear in your bochsrc: floppya: image="a.img", status=inserted
将程序加载到镜像文件
1 dd if=boot.bins of=a.img bs=512 count=1 conv=notrunc
编写 bochs 配置文件 bochsrs
1 2 3 4 5 6 7 8 megs:32 romimage: file =/usr/ share/bochs/ BIOS-bochs-latest vgaromimage: file =/usr/ share/bochs/ VGABIOS-lgpl-latest floppya : 1 _44=a.img, status=inserted boot : floppy log : bochsout.txt mouse : enabled=0
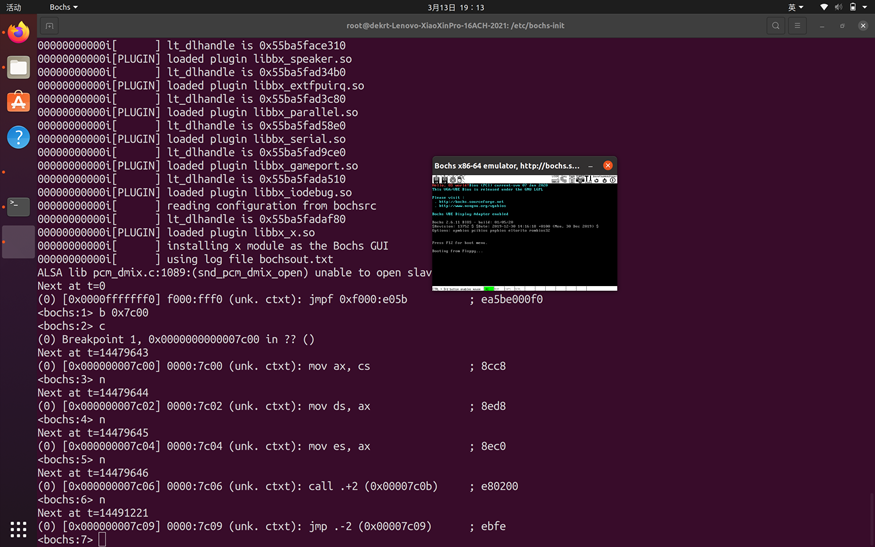
使用配置启动 bochs
1
2
3
4
5
6
7
8
9
10
11
12
13
14
15
16
17
18
19
20
21
22
23
24
25
26
27
28
29
30
31
32
33
34
35
36
37
38
39
40
41
42
43
44
45
46
47
48
49
50
51
======================================================================== Bochs x86 Emulator 2 .7 Built from SVN snapshot on August 1 , 2021 Timestamp: Sun Aug 1 10 :07 :00 CEST 2021 ======================================================================== 00000000000 i[ ] BXSHARE not set. using compile time default '/usr/share/bochs' 00000000000 i[ ] reading configuration from bochsrc Bochs Configuration: Main Menu------------------------------ This is the Bochs Configuration Interface, where you can describe the machine that you want to simulate. Bochs has already searched for a configuration file (typically called bochsrc.txt) and loaded it if it could be found. When you are satisfied with the configuration, go ahead and start the simulation. You can also start bochs with the -q option to skip these menus. 1 . Restore factory default configuration2 . Read options from...3 . Edit options4 . Save options to...5 . Restore the Bochs state from...6 . Begin simulation7 . Quit nowPlease choose one: [6 ] 6 00000000000 i[ ] installing x module as the Bochs GUI00000000000 i[ ] using log file bochsout.txt at t=0 (0 ) [0x0000fffffff0 ] f000:fff0 (unk. ctxt): jmpf 0xf000 :e05b <bochs:1> b 0x7c00 <bochs:2> c (0 ) Breakpoint 1 , 0x0000000000007c00 in ?? () Next at t=14034560 (0 ) [0x000000007c00 ] 0000 :7 c00 (unk. ctxt): mov ax, cs <bochs:3> n Next at t=14034561 (0 ) [0x000000007c02 ] 0000 :7 c02 (unk. ctxt): mov ds, ax <bochs:4> n Next at t=14034562 (0 ) [0x000000007c04 ] 0000 :7 c04 (unk. ctxt): mov es, ax <bochs:5> n Next at t=14034563 (0 ) [0x000000007c06 ] 0000 :7 c06 (unk. ctxt): call .+2 (0x00007c0b ) <bochs:6> n Next at t=14041965 (0 ) [0x000000007c09 ] 0000 :7 c09 (unk. ctxt): jmp .-2 (0x00007c09 ) <bochs:7>
依次输入直至窗口出现 Hello, OS world! 字样
image-20230712115223329
image-20230712115234417
3.2 裁剪并编译linux内核
开发环境:Ubuntu 20.04,内核版本:5.15.67,编辑工具:vim &
gedit
首先,前往 kernel.org
下载版本相近且高于运行版本的内核,本实验中选择5.15.100。下载完后将其解压至根目录:
1 $ sudo tar -xvJf linux-5.15.100.tar.xz /usr/src
image-20230712115240778
使用apt-get命令安装依赖:
1 2 3 4 5 6 7 $ sudo apt-get install gcc gdb bison flex $ sudo apt-get install libncurses5-dev libssl-dev $ sudo apt-get install libidn11-dev libidn11 $ sudo apt-get install zlibc minizip $ sudo apt-get install build-essential openssl $ sudo apt-get install libelf-dev $ sudo apt-get install dwarves
image-20230712115246500
然后进行更新:
进入到解压的文件目录下,依次运行这三条命令:
1 2 3 $ sudo make mrproper $ sudo make clean $ sudo make menuconfig
在menuconfig界面,依次选择save & exit
image-20230712115255174
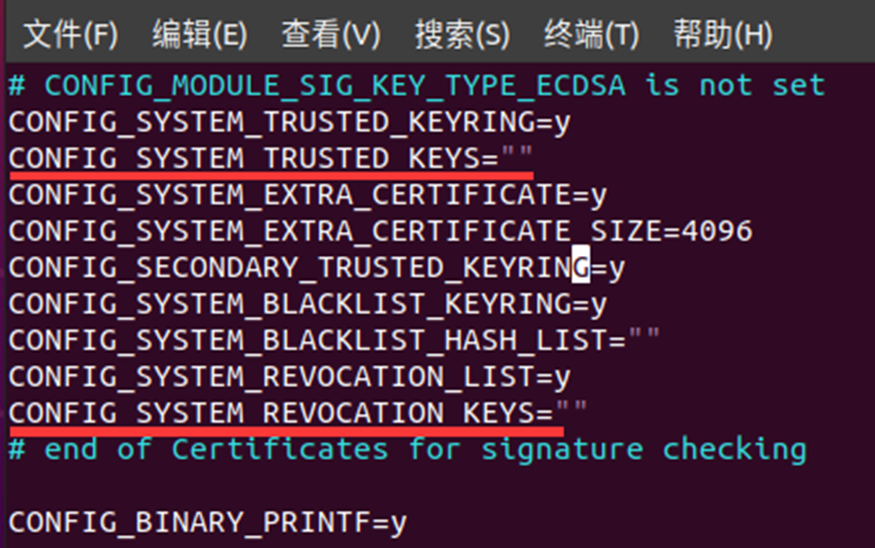
退出后,为了防止在编译内核时报如下错误:
1 2 3 4 make[1 ]: *** 没有规则可制作目标“debian/canonical-revoked-certs.pem”,由“certs/x509_revocation_list” 需求。 停止。 make[1 ]: *** 正在等待未完成的任务.... make: *** [Makefile :1868 :certs] 错误 2 make: *** 正在等待未完成的任务....
我们要修改config文件:使用
image-20230712115302106
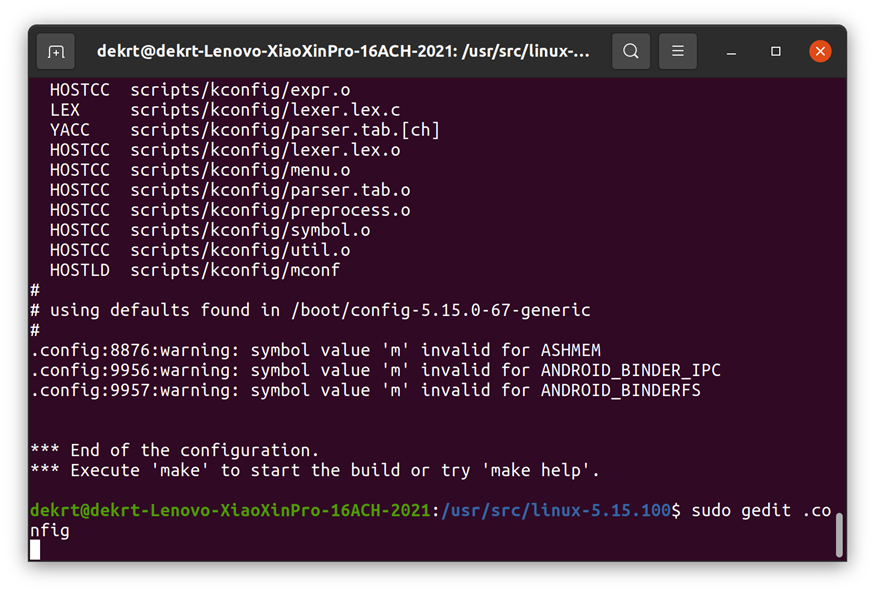
将.config文件中的
1 2 CONFIG_SYSTEM_TRUSTED_KEYS ="debian/canonical-certs.pem" CONFIG_SYSTEM_REVOCATION_KEYS ="debian/canonical-revoked-certs.pem"
修改为
1 2 CONFIG_SYSTEM_TRUSTED_KEYS ="" CONFIG_SYSTEM_REVOCATION_KEYS =""
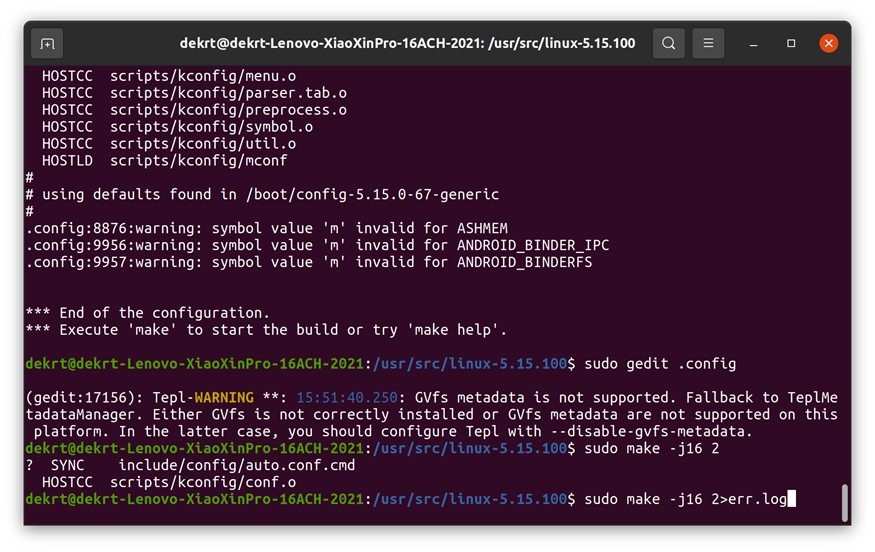
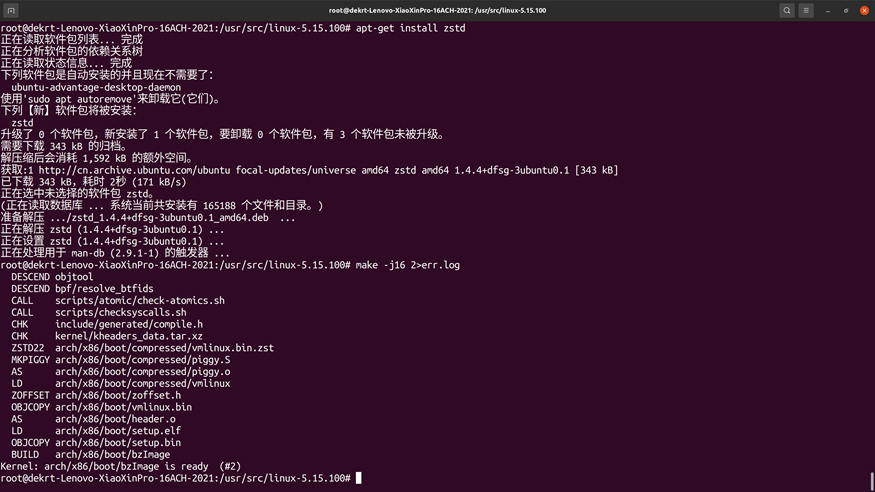
使用以下命令编译内核:
1 2 $ sudo su $ make -j16 2>err.log
image-20230712115309404
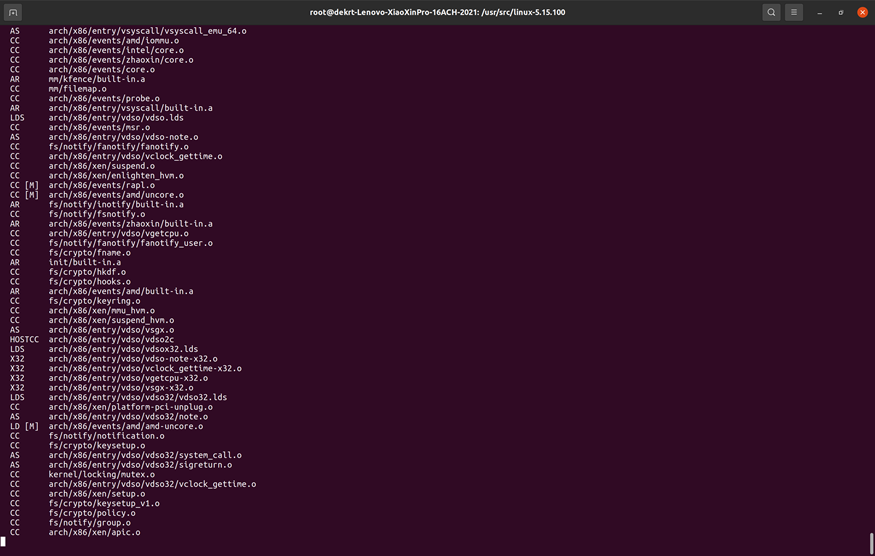
其中,2>err.log是将错误信息重定向到err.log文件中,便于在编译过程中排查错误;-j16可利用多线程提高编译速度(我的CPU是八核),过程十分漫长
image-20230712115314437
编译完成后会提示kernel is ready
image-20230712115319964
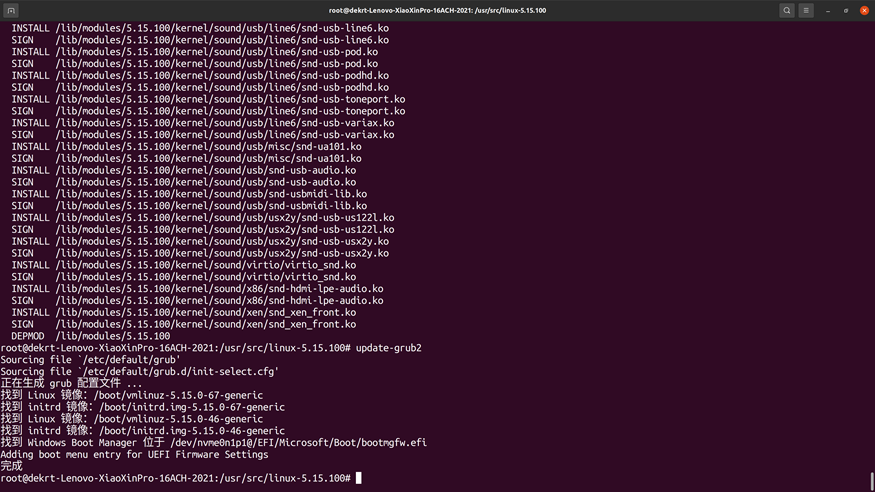
依次使用下列命令进行模块安装、内核安装、更新grub:
1 2 3 $ sudo make modules_install $ sudo make install $ sudo update-grub2
image-20230712115324506
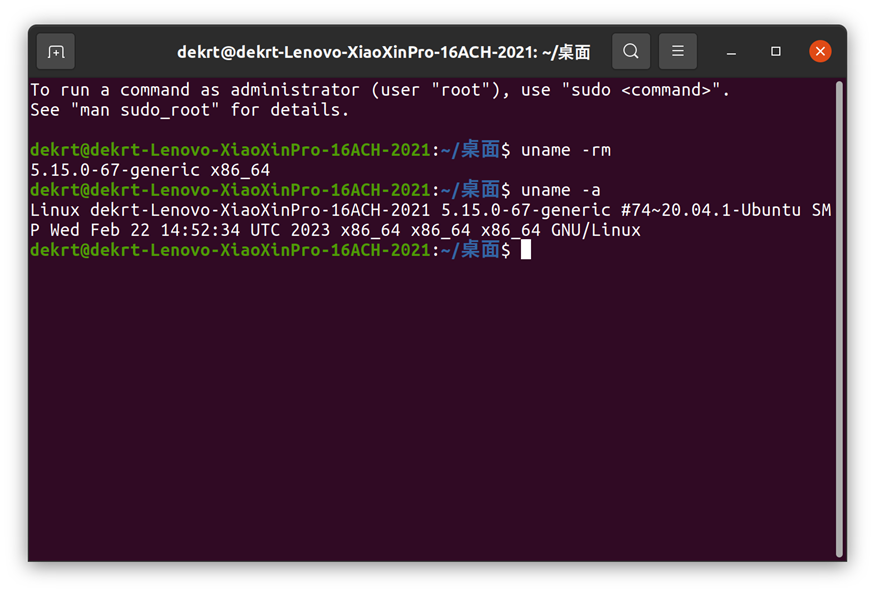
完成后重启,可以在ubuntu高级选项中看到编译成功的内核,加载成功后使用
查看当前内核版本
image-20230712115329423
3.3 为linux内核增添系统调用
开发环境:Ubuntu 20.04,内核版本:5.15.67,编辑工具:vim &
gedit
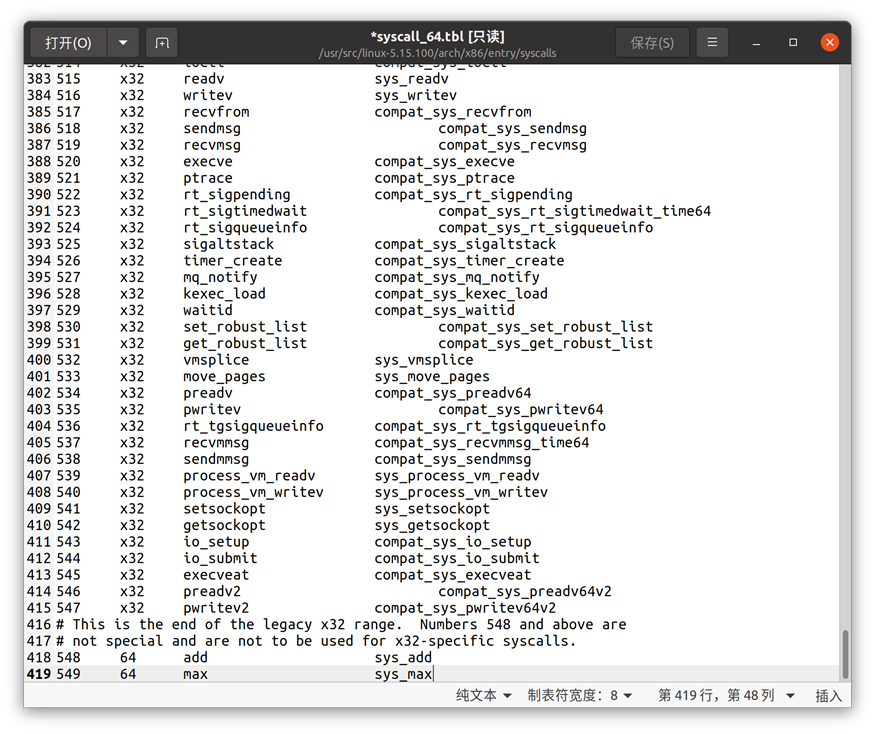
在/usr/src/linux-5.15.100/arch/x86/entry/syscalls目录,使用
1 sudo gedit syscall_64.tbl
在在547后面添加系统调用号548和549,分别为add函数和max函数的调用
image-20230712115339047
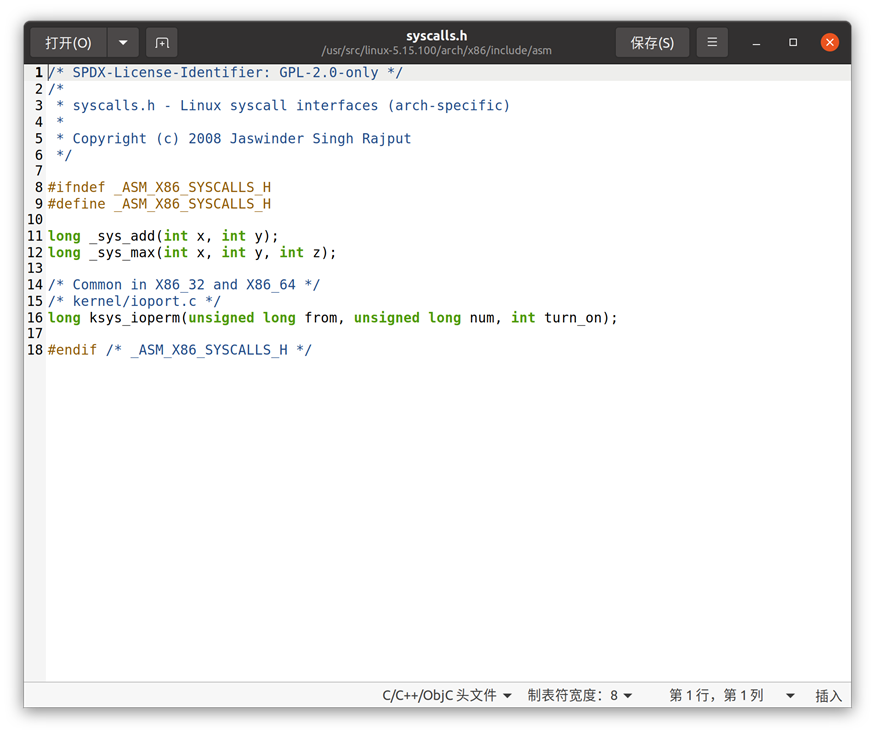
随后,使用
1 2 cd /usr/src/linux-5.15.100/arch/x86/include/asm vim syscalls.h
添加两个函数声明(注意使用long!!!)
image-20230712115345190
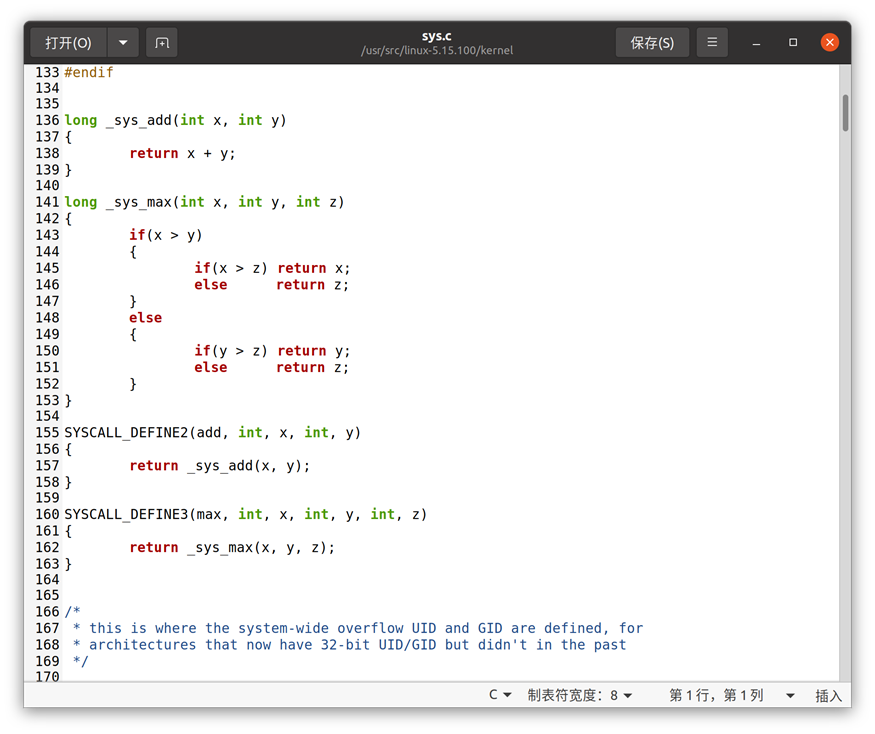
然后,使用
1 2 3 4 cd /use/src/linux-5.15.100/kernel vim sys.c # 或者使用下列命令 # sudo gedit sys.c
添加两个函数的定义
image-20230712115349982
然后,进行内核的编译:
1 2 cd /usr/src/linux-5.15.100/ sudo make menuconfig
选择save &
exit,同实验二中修改.config文件,使用下列命令进行编译、加载:
1 2 3 4 sudo su make -j16 2 >err.log make modules_installmake insatll
在ubuntu高级选项中看到编译成功的内核,加载之,进入桌面,使用
输入测试代码:
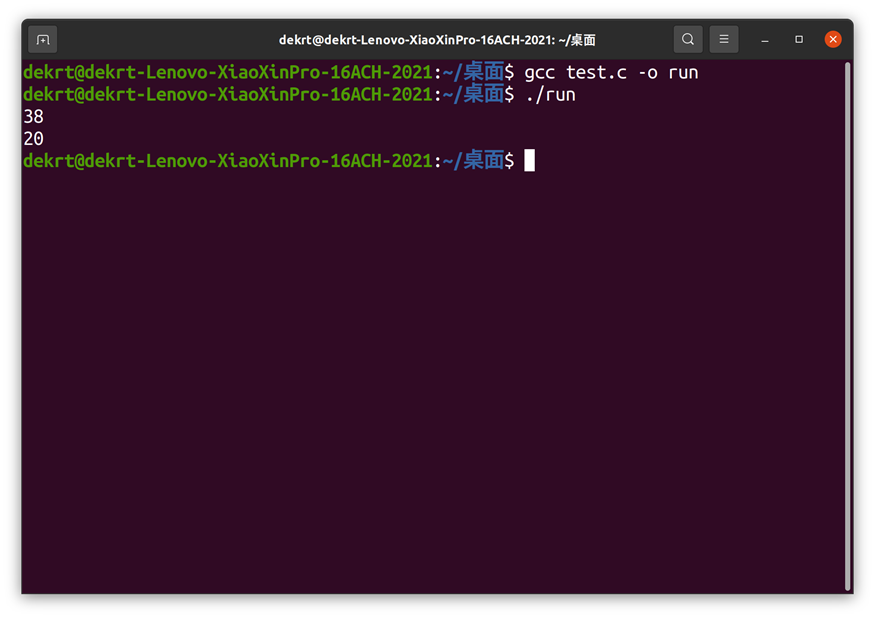
1 2 3 4 5 6 7 8 9 10 11 12 13 14 #include <stdio.h> #include <unistd.h> #include <linux/kernel.h> #include <sys/syscall.h> int main () int nRet; nRet = syscall(548 , 20 , 18 ); printf ("%d\n" , nRet); nRet = syscall(549 , 20 , 18 , 4 ); printf ("%d\n" , nRet); return 0 ; }
用:wq!保存退出,使用gcc编译运行:
查看输出,与预期结果一致。
image-20230712115406697
3.4 在linux下编写shell文件
开发环境:Ubuntu 20.04,内核版本:5.15.67,编辑工具:vim &
gedit
在终端中输入:
1 2 touch task4.sh vim task4.sh
输入我们的脚本:
1 2 3 4 5 6 7 8 9 10 11 12 13 14 15 16 17 18 19 20 21 22 23 24 25 26 27 28 29 30 # !/bin/bash # 获取当前日期和时间 date=$(date +%Y-%m-%d-%H-%M) # 获取脚本第一个参数,即目标目录 target_dir=$1 # 遍历目标目录中的所有文件 for file in "$target_dir"/* do # 如果文件是一个普通文件而不是目录 if [ -f "$file" ]; then # 获取文件名和扩展名 filename=$(basename -- "$file") extension="${filename##*.}" filename="${filename%.*}" # 如果文件名中已经有日期和时间后缀,则不再添加 if [[ $filename == *-$date ]]; then continue fi # 为文件名添加日期和时间后缀 new_filename="$filename-$date.$extension" # 重命名文件 mv "$file" "$target_dir/$new_filename" fi done
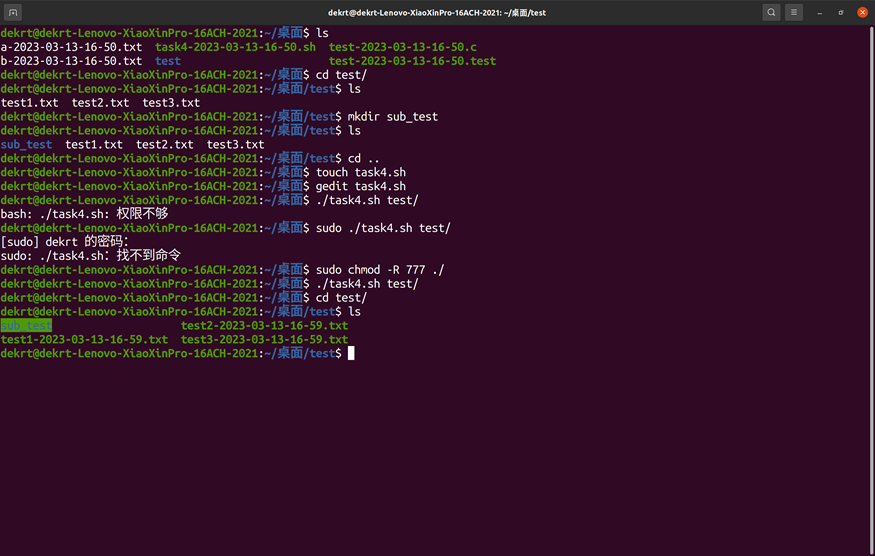
用:wq!保存退出,再新建测试文件:
1 2 3 4 5 mkdir test cd test touch test1.txt test2.txt mkdir sub_test cd ..
添加管理员权限:
运行脚本:
可以看到脚本成功运行
image-20230712115418817
四、实验结果
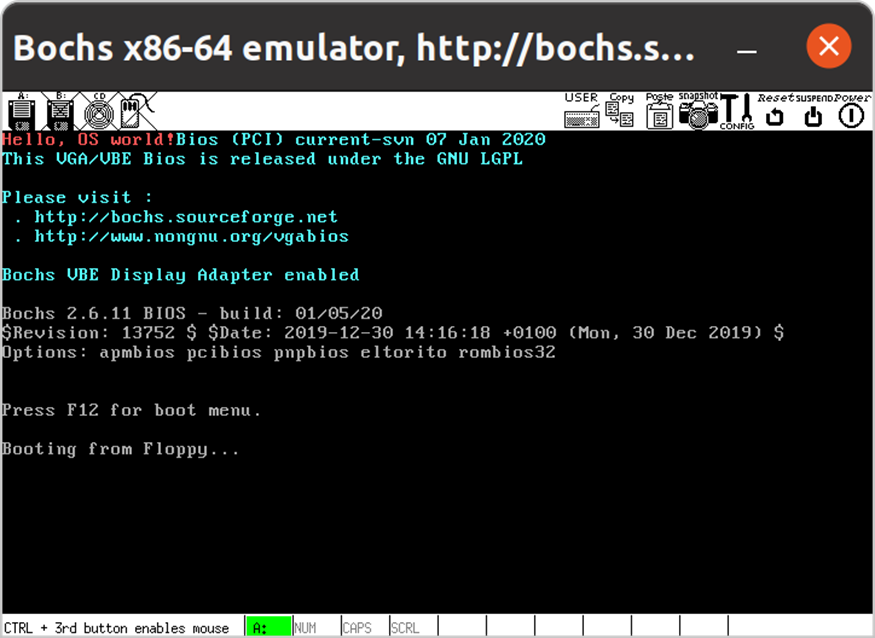
4.1 用NASM编写MBR引导程序
结果如图所示,屏幕上出现了Hello, OS world!因为boot.asm原理是先用b
0x7c00设断点,然后c指令让代码执行到断点,再一直n单步运行即可,会出现"Hello,
OS world!"。
image-20230712115425104
image-20230712115431025
4.2 裁剪并编译linux内核
编译完成后会提示kernel is ready
image-20230712115438488
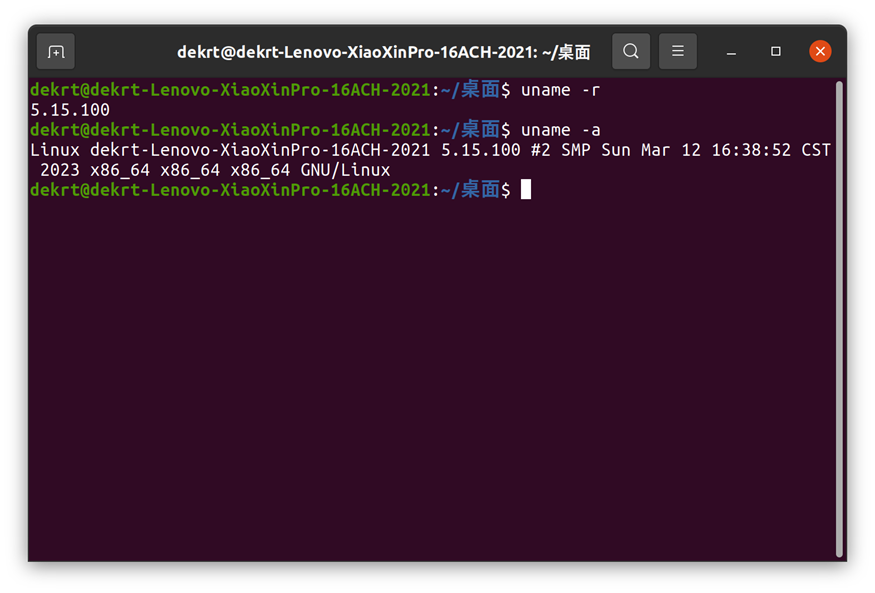
原linux内核版本信息如下:
image-20230712115444603
在ubuntu高级选项中选择编译成功的内核,加载之,使用相同的命令可以看到如下信息。证明内核编译成功:
image-20230712115450901
4.3 为linux内核增添系统调用
使用gcc编译我们的test.c文件,随后运行我们的run.exe
image-20230712115456676
4.4 在linux下编写shell文件
这里使用了touch命令创建了测试文件,用mkdir命令创建了测试子文件夹,然后使用./task5.sh ./命令运行自己编写的脚本,用ls命令查看脚本的运行结果。
image-20230712115502842
五、实验错误排查和解决方法
5.1 用NASM编写MBR引导程序
错误1:用bochs
-f bochsrc启动bochs时报错reading from bochsrc failed
这个错误通常意味着Bochs无法读取其配置文件(bochsrc),可能是因为文件不存在或者无法访问。经过查阅相关资料,得到了了如下的解决方案:
确保 bochsrc 文件存在于当前目录或指定的目录中。你可以使用
ls 命令查看当前目录的文件列表,或者使用 cd
命令切换到正确的目录。
确保你有读取 bochsrc 文件的权限。你可以使用 ls -l
命令查看文件权限。
如果你指定了一个非当前目录中的 bochsrc
文件,请确保路径是正确的。
如果你使用了 Windows 系统,请确保 bochsrc
文件名正确,并且大小写匹配。Windows 是大小写不敏感的,但是 Bochs
是大小写敏感的。
如果以上方法都无法解决问题,可以尝试重新安装 Bochs 或者查看 Bochs
的日志文件(通常位于 /var/log/bochs 或者
/var/log/messages)来查找更多信息。
基于上述描述,我对bochs文件进行了如下的改写:
1 2 3 4 5 6 7 8 megs:32 romimage: file =/usr/ share/bochs/ BIOS-bochs-latest vgaromimage: file =/usr/ share/bochs/ VGABIOS-lgpl-latest floppya : 1 _44=a.img, status=inserted boot : floppy log : bochsout.txt mouse : enabled=0
改写完成后,没有出现报错。
错误2:No bootable device
"No bootable device" 是 Bochs 模拟器的错误提示,通常意味着 Bochs
无法找到可引导设备或者无法正确读取 MBR
引导扇区。经过查阅我发现了如下的提示:
确保你的 MBR
引导程序编写正确,并且已经被正确地写入到可引导设备(通常是硬盘的第一个扇区)上。你可以使用
dd 命令将编写好的 MBR 引导程序写入到硬盘的第一个扇区。
确保你的 Bochs 配置文件(bochsrc)正确地指定了可引导设备。你可以使用
ata0-master 或 ata0-slave
指定硬盘设备。例如,如果你的硬盘映像文件为
disk.img,则可以添加以下行到你的 bochsrc 文件中:
1 ata0-master: type =disk, path ="disk.img" , mode =flat, cylinders =XXX, heads =XXX, spt =XXX
其中的 XXX 应该替换为你硬盘的实际参数。
确保 Bochs 正确读取了你的 bochsrc 文件。你可以在命令行中使用
-f 选项指定 bochsrc 文件路径:
1 bochs -f /path/to/bochsrc
确保你的 MBR
引导程序没有错误或死循环。你可以在编写代码时使用调试器或者添加输出语句来定位问题。
如果以上方法都无法解决问题,可以尝试重新安装 Bochs 或者查看 Bochs
的日志文件(通常位于 /var/log/bochs 或者
/var/log/messages)来查找更多信息。
经过对照,我将编译得到的boot.bins a.img文件同bochsrc放在一个目录下,之后再运行bochs虚拟机,没有报错。
5.2 裁剪并编译linux内核
问题1:缺少编译所需的软件包或库
1 "make: *** No rule to make target 'menuconfig'. Stop."
当运行 make menuconfig 命令时,出现 "make: *** No rule
to make target 'menuconfig'. Stop." 错误。
这个错误通常意味着缺少 ncurses 库。 Ubuntu
系统中,可以使用以下命令安装:
1 sudo apt-get install libncurses5-dev libncursesw5-dev
问题2:内核配置错误
1 error: Your kernel configuration is invalid.
解决方案:运行 make menuconfig
命令重新配置内核选项,确保所有选项都正确设置。
问题3:内存不足
1 virtual memory exhausted: Cannot allocate memory
解决方案:增加系统的虚拟内存或者物理内存。可以使用 dd
命令创建一个 swap 文件并将其挂载到系统上。
问题4:构建内核时缺少必需的文件或目录:
1 error: file 'arch/x86/entry/syscalls/syscall_64.tbl' not found
解决方案:运行 make ARCH=x86_64 headers_install
命令安装必要的文件和目录。
问题5:缺少内核模块
1 error: module 'xxx' not found
解决方案:运行 make modules_install
命令安装内核模块。
问题6:没有规则可制作目标
在编译时出现下列报错:
1 2 3 4 5 6 make[1 ]: *** 没有规则可制作目标“debian/canonical-revoked-certs.pem”,由“certs/x509_revocation_list” 需求。 停止。 make[1 ]: *** 正在等待未完成的任务.... CC certs/blacklist.oCC kernel/watchdog_hld.omake: *** [Makefile :1868 :certs] 错误 2 make: *** 正在等待未完成的任务....
解决方法:
只要你在编译内核的时候,报错类似如上的错误,都可以用此方法去解决。具体如下:
1、编辑 .config 配置文件。
1 root@ubuntu-VirtualBox:/usr/ src/linux
2、再将
1 2 CONFIG_SYSTEM_TRUSTED_KEYS ="debian/canonical-certs.pem" CONFIG_SYSTEM_REVOCATION_KEYS ="debian/canonical-revoked-certs.pem"
修改为:
1 2 CONFIG_SYSTEM_TRUSTED_KEYS ="" CONFIG_SYSTEM_REVOCATION_KEYS =""
image-20230712115513764
3、保存后,再次重新执行“编译内核”命令即可!
5.3 为linux内核增添系统调用
错误1:编译时出现undefined:__x64_sys_add
在编译内核直到最后一步生成vmlinux虚拟机的时候才会出现上述报错,排查起来非常耗时耗力。经过与同学们讨论,发现在编写syscall_64.tbl时不能使用__x64_sys_add,只能使用sys_add。其次,在编写函数时,不能使用int类型作为返回值,必须使用long作为返回值。全部修改后,正常编译。
错误2:模块加载错误
使用下列命令进行检查
1 lsmod | grep [module_name]
如果没有输出或出现错误消息,则表示模块没有正确加载,可以尝试重新编译和加载模块。
错误3:修改编译后仍然是修改前的结果
因为make程序有缓存,编译前应该执行make mrproper && make clean清除之前编译生成的目标文件。
5.4 在linux下编写shell文件
错误1:解释器错误
错误信息:/bin/bash: bad interpreter: No such file or directory
这个错误通常是因为脚本的第一行指定的解释器不正确或解释器路径错误。
解决方法:检查脚本的第一行,确保解释器路径正确。
例如:
错误2:权限问题
错误信息:Permission denied
这个错误通常是因为脚本没有执行权限。
解决方法:使用 chmod 命令赋予脚本执行权限。
错误3:语法错误
错误信息:syntax error near unexpected token
这个错误通常是因为脚本中存在语法错误。
解决方法:检查脚本的语法,确保语法正确。
错误4:变量未定义
错误信息:uninitialized variable
这个错误通常是因为脚本中使用了未定义的变量。
解决方法:确保变量已经定义并且有值。
1 2 bashCopy code#!/bin/ bash echo $u ndefined_variable
六、实验参考资料和网址
教学课件
解决Linux"没有规则可制作目标“debian/canonical-revoked-certs.pem”,由“certs/x509_revocation_list”
需求。https://www.xgboke.com/16586.html
NASM官方网站:https://www.nasm.us/
NASM教程:https://cs.lmu.edu/~ray/notes/nasmtutorial/
《PC Assembly
Language》:https://pacman128.github.io/pcasm/
Ubuntu官方网站:https://ubuntu.com/
Linux内核官方网站:https://www.kernel.org/
《深入理解Linux内核》第五版第三章
《深入理解Linux内核》第五版第十二章
Linux Shell教程:https://www.learnshell.org/
Windows批处理教程:https://www.tutorialspoint.com/batch_script/
《操作系统原理》实验报告(二)
姓名
dekrt
学号
U2021172??
专业班级
软件2102班
时间
2023.04.10
一、实验目的
1)理解进程/线程的概念和应用编程过程;
2)理解进程/线程的同步机制和应用编程;
3)掌握和推广国产操作系统(推荐银河麒麟或优麒麟,建议)
二、实验内容
1)在Linux/Windows下创建2个线程A和B,循环输出数据或字符串。
2)在Linux下创建(fork)一个子进程,实验wait/exit函数。
3)在Windows/Linux下,利用线程实现并发画圆画方。
4)在Windows或Linux下利用线程实现“生产者-消费者”同步控制。
5)在Linux下利用信号机制(signal)实现进程通信。
6)在Windows或Linux下模拟哲学家就餐,提供死锁和非死锁解法。
7)研读Linux内核并用printk调试进程创建和调度策略的相关信息。
三、实验环境和核心代码
3.1 运用线程分别输出数据
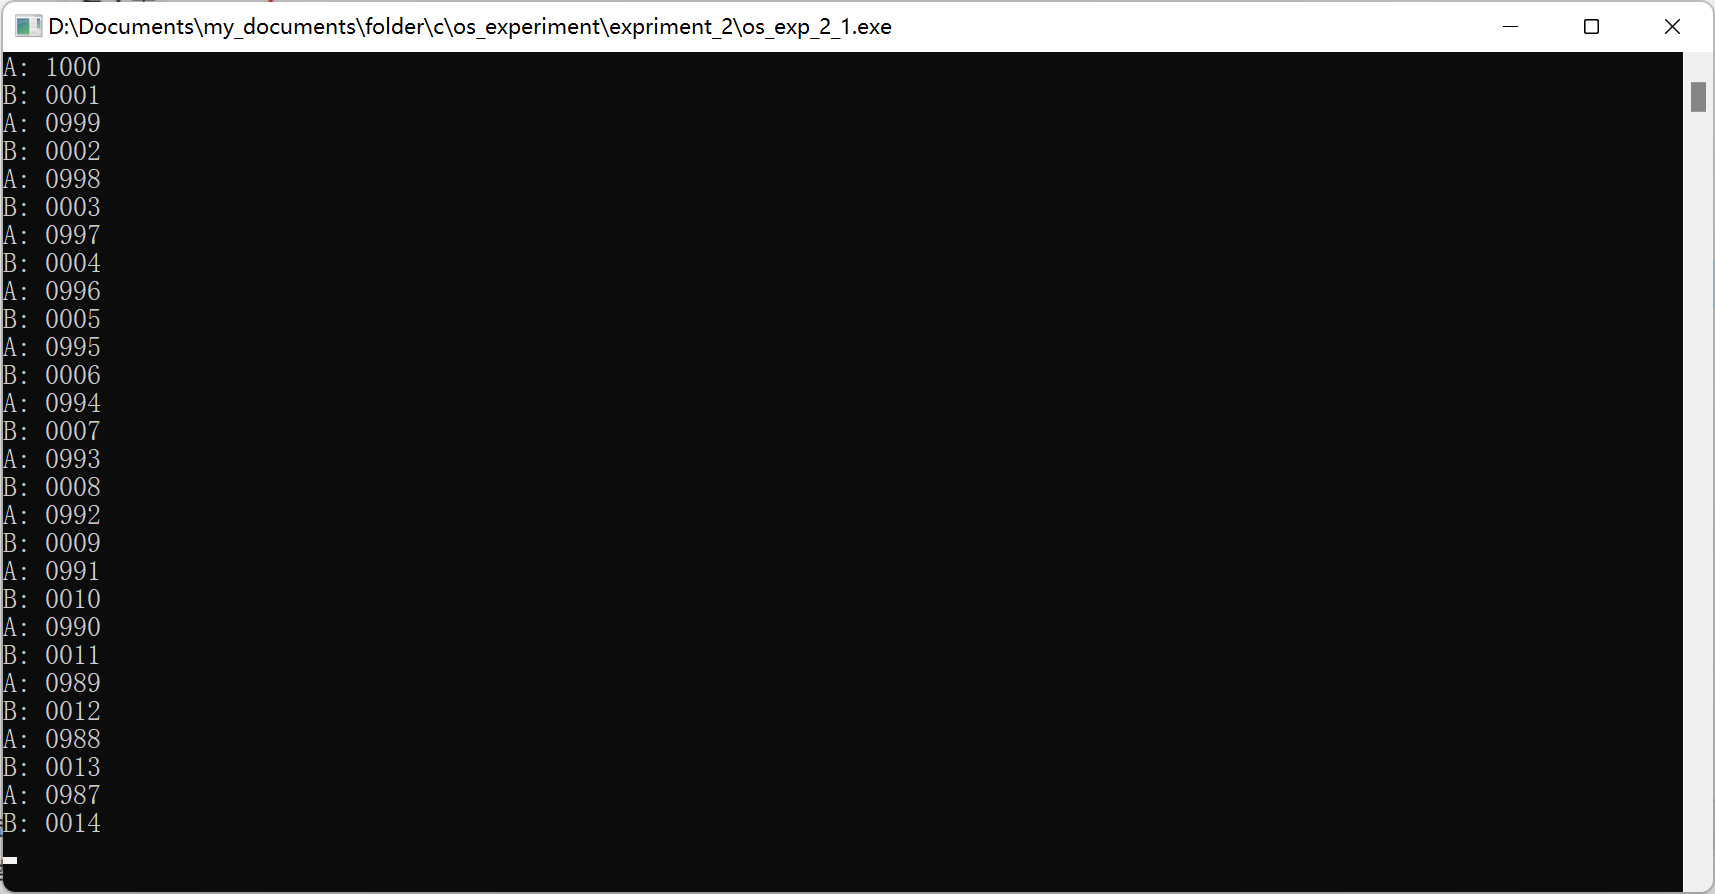
开发环境:windows 11,编辑工具:vscode , 编译工具: gcc
核心代码,输出见注释:
1 2 3 4 5 6 7 8 9 10 11 12 13 14 15 16 17 18 19 20 21 22 23 24 25 26 27 28 29 30 31 32 33 34 35 36 37 38 39 40 #include <stdio.h> #include <unistd.h> #include <pthread.h> #define re register void * thread_1 (void * arg) usleep (10000 ); int i; for (i = 1 ; i <= 1000 ; i++) { printf ("B: %04d\n" , i); usleep (200000 ); } return NULL ; } void * thread_2 (void * arg) int i; for (i = 1000 ; i >= 1 ; i--) { printf ("A: %04d\n" , i); usleep (200000 ); } return NULL ; } int main () pthread_t pid1, pid2; pthread_create (&pid1, NULL , thread_1, NULL ); pthread_create (&pid2, NULL , thread_2, NULL ); pthread_join (pid1, NULL ); pthread_join (pid2, NULL ); return 0 ; }
3.2 Linux下实验wait/exit函数
开发环境:Ubuntu 20.04,内核版本:5.15.67,编辑工具:vim &
gedit, 编译工具: gcc
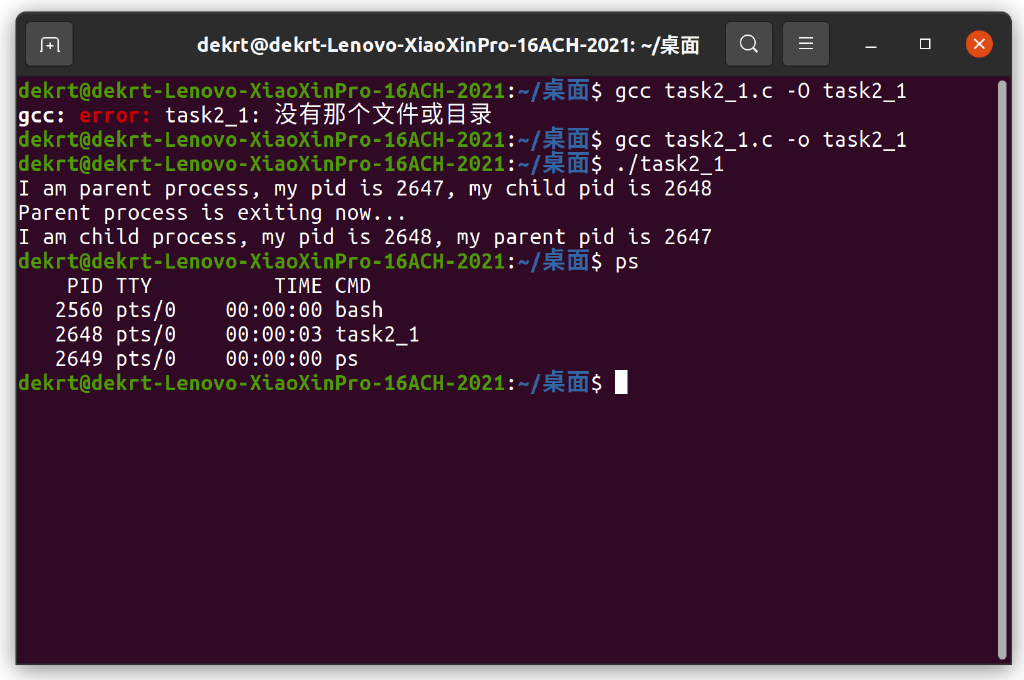
3.2.1 效果一
1 2 3 4 5 6 7 8 9 10 11 12 13 14 15 16 17 18 19 20 21 22 23 24 25 26 27 28 29 30 31 32 33 34 35 36 #include <stdio.h> #include <stdlib.h> #include <unistd.h> #include <sys/types.h> #include <sys/wait.h> int main () pid_t pid; pid = fork(); if (pid < 0 ) { perror ("fork failed" ); exit (1 ); } else if (pid == 0 ) { printf ("I am child process, my pid is %d, my parent pid is %d\n" , getpid (), getppid ()); while (1 ) { } } else { printf ("I am parent process, my pid is %d, my child pid is %d\n" , getpid (), pid); printf ("Parent process is exiting now...\n" ); exit (0 ); } return 0 ; }
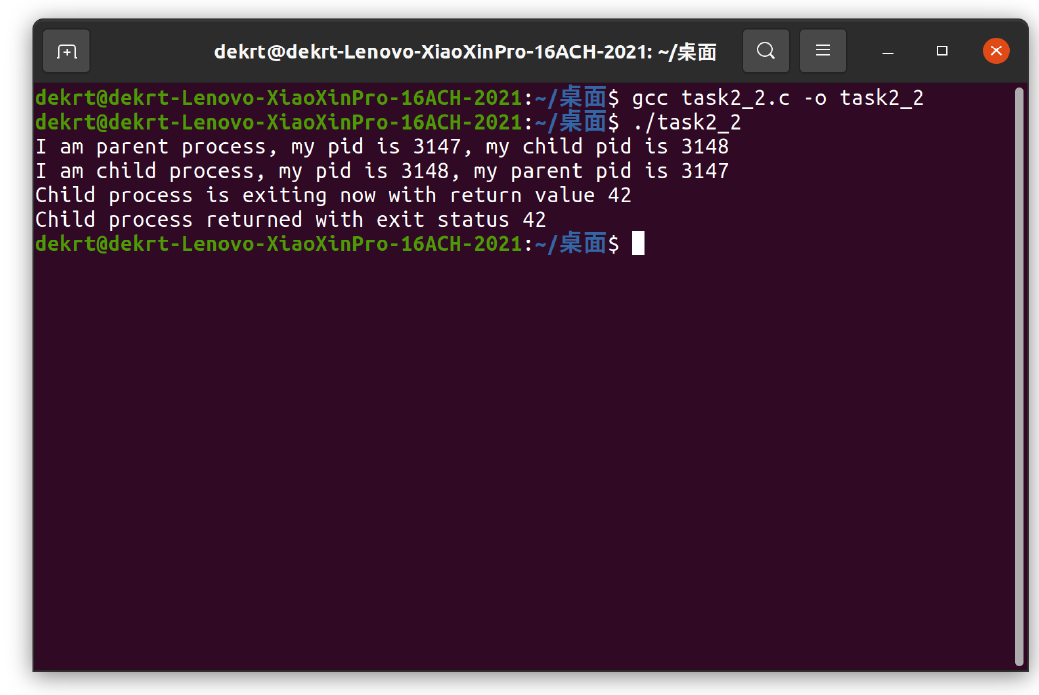
3.2.2 效果二
1 2 3 4 5 6 7 8 9 10 11 12 13 14 15 16 17 18 19 20 21 22 23 24 25 26 27 28 29 30 31 32 33 34 35 36 37 #include <stdio.h> #include <stdlib.h> #include <unistd.h> #include <sys/types.h> #include <sys/wait.h> int main () pid_t pid; int status; pid = fork(); if (pid < 0 ) { perror ("fork failed" ); exit (1 ); } else if (pid == 0 ) { printf ("I am child process, my pid is %d, my parent pid is %d\n" , getpid (), getppid ()); sleep (5 ); printf ("Child process is exiting now with return value 42\n" ); exit (114514 ); } else { printf ("I am parent process, my pid is %d, my child pid is %d\n" , getpid (), pid); wait (&status); printf ("Child process returned with exit status %d\n" , WEXITSTATUS (status)); } return 0 ; }
3.3 “生产者-消费者”同步控制
开发环境:windows 11,编辑工具:vscode , 编译工具: gcc
1 2 3 4 5 6 7 8 9 10 11 12 13 14 15 16 17 18 19 20 21 22 23 24 25 26 27 28 29 30 31 32 33 34 35 36 37 38 39 40 41 42 43 44 45 46 47 48 49 50 51 52 53 54 55 56 57 58 59 60 61 62 63 64 65 66 67 68 69 70 71 72 73 74 75 76 77 78 79 80 81 82 83 84 85 86 87 88 89 90 91 92 93 94 95 96 97 98 99 100 101 102 103 104 105 106 107 108 109 110 111 112 113 114 115 116 117 118 119 120 121 122 123 124 125 126 127 128 129 130 131 132 133 134 135 136 137 138 139 #include <Windows.h> #include <iostream> #include <thread> #include <chrono> #define BUFFER_SIZE 10 CRITICAL_SECTION g_csBuffer; int g_Buffer[BUFFER_SIZE] = {0 };int g_nCount = 0 ;HANDLE g_hSemProd1; HANDLE g_hSemProd2; HANDLE g_hSemCons; void PrintBuffer () std::cout << "Buffer Status: " ; for (int i = 0 ; i < BUFFER_SIZE; i++) { if (g_Buffer[i] == 0 ) { std::cout << "[ ]" ; } else { std::cout << "[" << g_Buffer[i] << "]" ; } } std::cout << std::endl; } DWORD WINAPI ProducerThread (LPVOID lpParam) int nProducerID = *(int *)lpParam; int nStartNum = nProducerID * 1000 ; srand (GetCurrentThreadId ()); while (true ) { int nData = nStartNum + rand () % 1000 ; Sleep (rand () % 901 + 100 ); EnterCriticalSection (&g_csBuffer); if (g_nCount == BUFFER_SIZE) { LeaveCriticalSection (&g_csBuffer); if (nProducerID == 1 ) { WaitForSingleObject (g_hSemProd1, INFINITE); } else { WaitForSingleObject (g_hSemProd2, INFINITE); } } else { g_Buffer[g_nCount] = nData; g_nCount++; std::cout << "Producer " << nProducerID << " produced data: " << nData << std::endl; PrintBuffer (); LeaveCriticalSection (&g_csBuffer); ReleaseSemaphore (g_hSemCons, 1 , NULL ); } } return 0 ; } DWORD WINAPI ConsumerThread (LPVOID lpParam) int nConsumerID = *(int *)lpParam; srand (GetCurrentThreadId ()); while (true ) { Sleep (rand () % 901 + 100 ); EnterCriticalSection (&g_csBuffer); if (g_nCount == 0 ) { LeaveCriticalSection (&g_csBuffer); WaitForSingleObject (g_hSemCons, INFINITE); } else { int nData = g_Buffer[0 ]; for (int i = 0 ; i < g_nCount - 1 ; i++) { g_Buffer[i] = g_Buffer[i + 1 ]; } g_Buffer[g_nCount - 1 ] = 0 ; g_nCount--; std::cout << "Consumer " << nConsumerID << " consumed data: " << nData << std::endl; PrintBuffer (); LeaveCriticalSection (&g_csBuffer); if (nData >= 1000 && nData <= 1999 ) { ReleaseSemaphore (g_hSemProd1, 1 , NULL ); } else { ReleaseSemaphore (g_hSemProd2, 1 , NULL ); } } } return 0 ; } int main () InitializeCriticalSection (&g_csBuffer); g_hSemProd1 = CreateSemaphore (NULL , BUFFER_SIZE, BUFFER_SIZE, NULL ); g_hSemProd2 = CreateSemaphore (NULL , BUFFER_SIZE, BUFFER_SIZE, NULL ); g_hSemCons = CreateSemaphore (NULL , 0 , BUFFER_SIZE, NULL ); int nProd1ID = 1 , nProd2ID = 2 , nCons1ID = 1 , nCons2ID = 2 , nCons3ID = 3 ; HANDLE hProd1 = CreateThread (NULL , 0 , ProducerThread, &nProd1ID, 0 , NULL ); HANDLE hProd2 = CreateThread (NULL , 0 , ProducerThread, &nProd2ID, 0 , NULL ); HANDLE hCons1 = CreateThread (NULL , 0 , ConsumerThread, &nCons1ID, 0 , NULL ); HANDLE hCons2 = CreateThread (NULL , 0 , ConsumerThread, &nCons2ID, 0 , NULL ); HANDLE hCons3 = CreateThread (NULL , 0 , ConsumerThread, &nCons3ID, 0 , NULL ); WaitForSingleObject (hProd1, INFINITE); WaitForSingleObject (hProd2, INFINITE); WaitForSingleObject (hCons1, INFINITE); WaitForSingleObject (hCons2, INFINITE); WaitForSingleObject (hCons3, INFINITE); CloseHandle (hProd1); CloseHandle (hProd2); CloseHandle (hCons1); CloseHandle (hCons2); CloseHandle (hCons3); CloseHandle (g_hSemProd1); CloseHandle (g_hSemProd2); CloseHandle (g_hSemCons); DeleteCriticalSection (&g_csBuffer); return 0 ; }
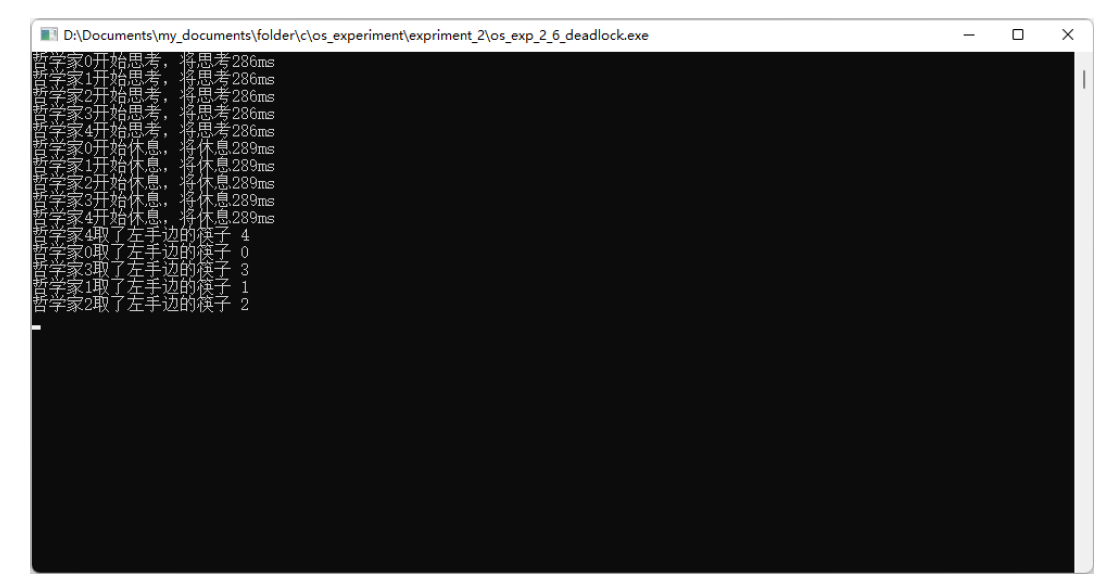
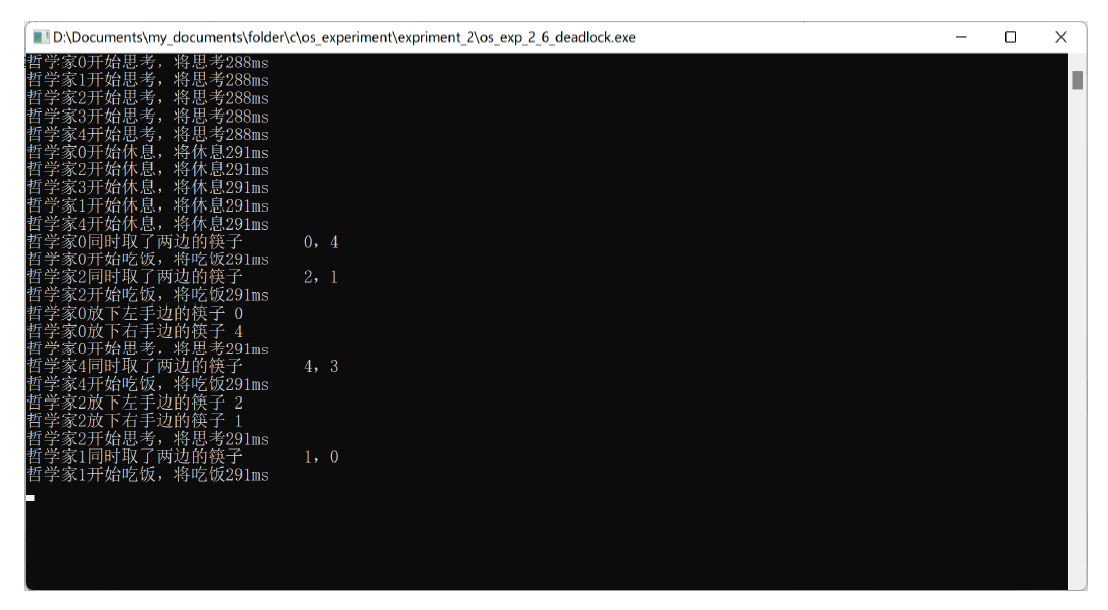
3.4 模拟哲学家就餐
开发环境:windows 11,编辑工具:vscode , 编译工具: gcc
3.4.1 可能产生死锁
1 2 3 4 5 6 7 8 9 10 11 12 13 14 15 16 17 18 19 20 21 22 23 24 25 26 27 28 29 30 31 32 33 34 35 36 37 38 39 40 41 42 43 44 45 46 47 48 49 50 51 52 53 54 55 56 57 58 59 60 61 62 #undef UNICODE #include <stdio.h> #include <windows.h> #include <time.h> #include <string> int i = 0 ;std::string name[5 ] = { "0" ,"1" ,"2" ,"3" ,"4" }; int a[5 ] = { 1 ,1 ,1 ,1 ,1 };int random (void ) int a = time (NULL ); srand (a); return (rand () % 400 + 100 ); } DWORD WINAPI philosopher (LPVOID lpParam) { int id = i++; int time; HANDLE right, left; left = OpenSemaphore (SEMAPHORE_ALL_ACCESS, FALSE, name[id].c_str ()); right = OpenSemaphore (SEMAPHORE_ALL_ACCESS, FALSE, name[(id + 4 ) % 5 ].c_str ()); while (1 ) { time = random (); printf ("哲学家%d开始思考,将思考%dms\n" , id, time); Sleep (time); time = random (); printf ("哲学家%d开始休息,将休息%dms\n" , id, time); Sleep (time); WaitForSingleObject (left, INFINITE); printf ("哲学家%d取了左手边的筷子\t%d\n" , id, id); WaitForSingleObject (right, INFINITE); printf ("哲学家%d取了右手边的筷子\t%d\n" , id, (id + 4 ) % 5 ); time = random (); printf ("哲学家%d开始吃饭,将吃饭%dms\n" , id, time); Sleep (time); ReleaseSemaphore (left, 1 , NULL ); printf ("哲学家%d放下左手边的筷子\t%d\n" , id, id); ReleaseSemaphore (right, 1 , NULL ); printf ("哲学家%d放下右手边的筷子\t%d\n" , id, (id + 4 ) % 5 ); } } int main (void ) HANDLE S[5 ]; HANDLE hThread[5 ]; for (int i = 0 ; i < 5 ; i++) { S[i] = CreateSemaphore (NULL , 1 , 1 , name[i].c_str ()); } for (int i = 0 ; i < 5 ; i++) { hThread[i] = CreateThread (NULL , 0 , philosopher, NULL , 0 , NULL ); } WaitForMultipleObjects (5 , hThread, TRUE, INFINITE); for (int i = 0 ; i < 5 ; i++) { CloseHandle (S[i]); } }
3.4.2 不会产生死锁
1 2 3 4 5 6 7 8 9 10 11 12 13 14 15 16 17 18 19 20 21 22 23 24 25 26 27 28 29 30 31 32 33 34 35 36 37 38 39 40 41 42 43 44 45 46 47 48 49 50 51 52 53 54 55 56 57 58 59 60 61 62 #undef UNICODE #include <stdio.h> #include <windows.h> #include <time.h> #include <string> int i = 0 ;std::string name[5 ] = { "0" ,"1" ,"2" ,"3" ,"4" }; int a[5 ] = { 1 ,1 ,1 ,1 ,1 };int random (void ) int a = time (NULL ); srand (a); return (rand () % 400 + 100 ); } DWORD WINAPI philosopher (LPVOID lpParam) { srand ((unsigned )time (NULL )); int id = i++; int time; HANDLE chops[2 ]; chops[0 ] = OpenSemaphore (SEMAPHORE_ALL_ACCESS, FALSE, name[id].c_str ()); chops[1 ] = OpenSemaphore (SEMAPHORE_ALL_ACCESS, FALSE, name[(id + 4 ) % 5 ].c_str ()); while (1 ) { time = random (); printf ("哲学家%d开始思考,将思考%dms\n" , id, time); Sleep (time); time = random (); printf ("哲学家%d开始休息,将休息%dms\n" , id, time); Sleep (time); WaitForMultipleObjects (2 , chops, true , INFINITE); printf ("哲学家%d同时取了两边的筷子\t%d,%d\n" , id, id, (id + 4 ) % 5 ); time = random (); printf ("哲学家%d开始吃饭,将吃饭%dms\n" , id, time); Sleep (time); ReleaseSemaphore (chops[0 ], 1 , NULL ); printf ("哲学家%d放下左手边的筷子\t%d\n" , id, id); ReleaseSemaphore (chops[1 ], 1 , NULL ); printf ("哲学家%d放下右手边的筷子\t%d\n" , id, (id + 4 ) % 5 ); } } int main (void ) HANDLE S[5 ]; HANDLE hThread[5 ]; for (int i = 0 ; i < 5 ; i++) { S[i] = CreateSemaphore (NULL , 1 , 1 , name[i].c_str ()); } for (int i = 0 ; i < 5 ; i++) { hThread[i] = CreateThread (NULL , 0 , philosopher, NULL , 0 , NULL ); } WaitForMultipleObjects (5 , hThread, TRUE, INFINITE); for (int i = 0 ; i < 5 ; i++) { CloseHandle (S[i]); } }
3.5
Linux下调用printk查看进程信息
编写应用程序Hello.c,代码如下:
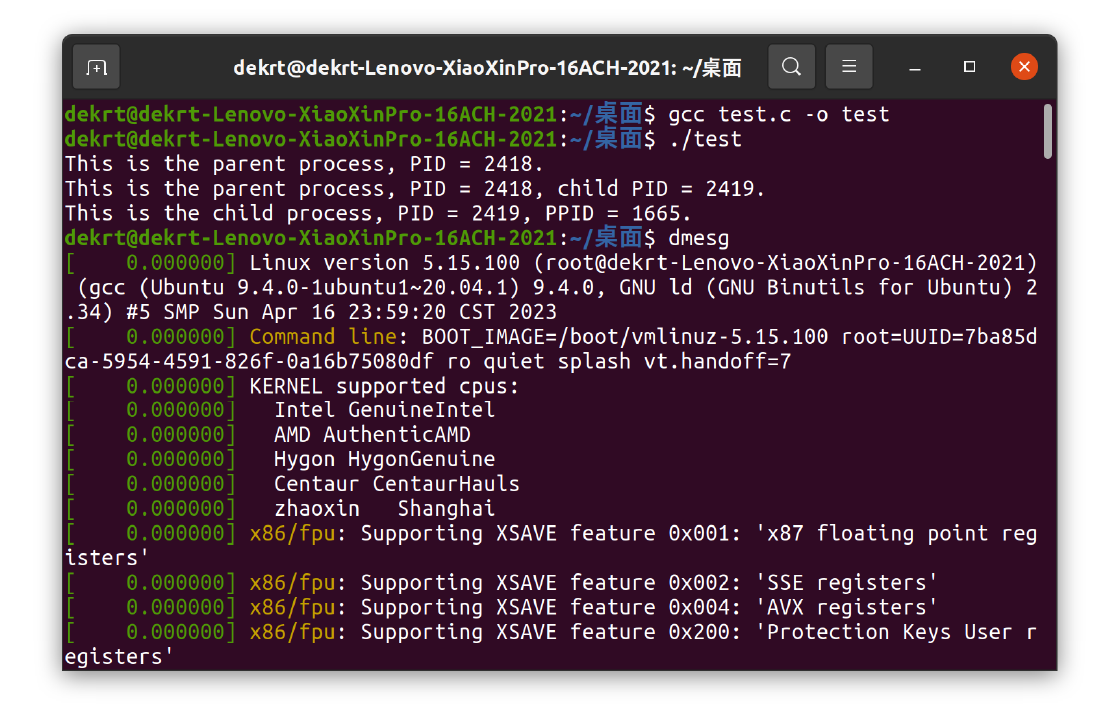
1 2 3 4 5 6 7 8 9 10 11 12 13 14 15 16 17 18 19 20 21 #include <stdio.h> #include <unistd.h> int main () pid_t pid; printf ("This is the parent process, PID = %d.\n" , getpid()); pid = fork(); if (pid == 0 ) { printf ("This is the child process, PID = %d, PPID = %d.\n" , getpid(), getppid()); } else { printf ("This is the parent process, PID = %d, child PID = %d.\n" , getpid(), pid); } return 0 ; }
该程序先输出父进程的PID,然后调用fork创建子进程,分别输出父进程、子进程的PID以及父进程对应的子进程PID。
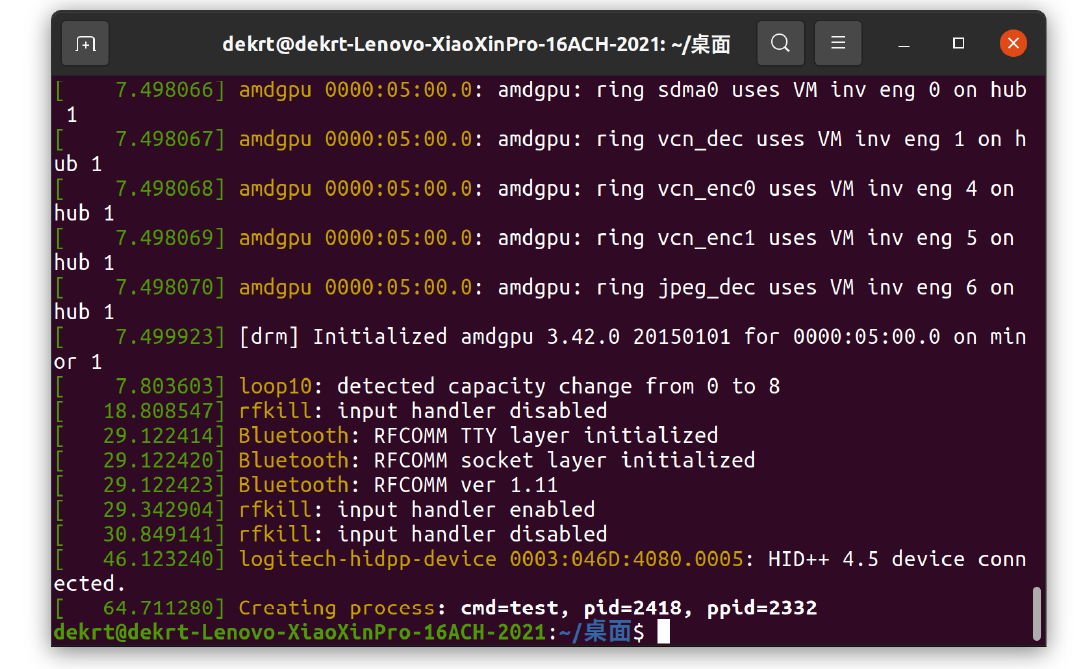
在Linux内核中找到do_fork函数,该函数定义在kernel/fork.c文件中。在该函数内,根据提示2,我们可以添加代码以输出调试信息。为了避免频繁输出调试信息,可以使用全局变量和系统调用来控制输出。
首先,在include/linux/init.h文件中定义全局变量和系统调用:
1 2 extern bool my_debug_flag;extern void set_my_debug (bool value)
其中my_debug_flag表示是否输出调试信息的标志,set_my_debug函数用于修改标志的值。
然后,在kernel/fork.c文件中定义全局变量和系统调用的具体实现:
1 2 3 4 5 6 7 bool my_debug_flag = false ;void set_my_debug (bool value) my_debug_flag = value; } EXPORT_SYMBOL(set_my_debug);
其中,EXPORT_SYMBOL用于将set_my_debug函数导出,使得应用程序可以调用该函数。
接下来,在copy_process函数中添加代码以输出调试信息:
1 2 3 4 if (my_debug_flag) { printk(KERN_INFO "Creating Process: cmd=%s, pid=%d, ppid=%d\n" , current->comm, current->pid, current->parent->pid); }
该代码会在创建进程时输出调试信息,其中current->comm表示当前进程的命令名,current->pid表示新创建进程的PID,current->parent->pid表示当前进程的父进程的PID。
最后,在Hello.c中添加代码以控制是否输出调试信息:
1 2 3 4 5 6 7 8 9 10 11 12 13 14 15 16 17 18 19 20 21 22 23 24 25 #include <stdio.h> #include <unistd.h> #include <sys/syscall.h> #define SET_DEBUG_FLAG 550 int main () pid_t pid; printf ("This is the parent process, PID = %d.\n" , getpid()); syscall(SET_DEBUG_FLAG, 1 ); pid = fork(); syscall(SET_DEBUG_FLAG, 0 ); if (pid == 0 ) { printf ("This is the child process, PID = %d, PPID = %d.\n" , getpid(), getppid()); } else { printf ("This is the parent process, PID = %d, child PID = %d.\n" , getpid(), pid); } return 0 ; }
其中,syscall用于调用系统调用,SET_DEBUG_FLAG是自定义的系统调用号,1表示开启调试信息输出,0表示关闭调试信息输出。
四、实验结果
4.1 运用线程分别输出数据
image-20230410185350620
4.2 Linux下实验wait/exit函数
4.2.1 效果一
image-20230719212749631
4.2.2 效果二
image-20230719212759924
4.3 “生产者-消费者”同步控制
image-20230719212807507
4.4 在linux下编写shell文件
4.4.1 死锁解法
image-20230719212816563
4.4.2 非死锁解法
image-20230719212826164
4.5
Linux下调用printk查看进程信息
image-20230719212833145
Creating Process的输出出现在最后一行。
image-20230719212841111
五、实验错误排查和解决方法
5.1
[Error] cast from 'LPVOID {aka void*}' to 'int' loses precision
[-fpermissive]
在类型转换时,有如下代码:
1 2 3 4 5 6 DWORD WINAPI philosopher (LPVOID param) ... int id = (int )param; ... }
在强制类型转换时会报错,应做如下修改:
1 2 3 4 5 6 DWORD WINAPI philosopher (LPVOID param) ... int id = *(int *)param; ... }
5.2 Linux下用printk输出信息
添加printk代码时,要注意添加到copy_process函数中,因为较高版本的linux内核中fork.c文件不存在do_fork()函数。
添加printk代码时,要在字符串前添加KERN_INFO的宏定义,防止调试信息在dmesg中被过滤。
编译内核时属于增量编译,速度较快,但是编译完成后要使用make modules_install
和 make install命令进行安装,否则会出错。
添加全局变量时,要注意EXPORT_SYMBOL(set_my_debug);
六、实验参考资料和网址
Linux下创建2个线程A和B,循环输出数据或字符串
参考资料:
https://www.geeksforgeeks.org/creating-threads-in-linux-using-pthread/
网址: https://github.com/Abdurraheem/Two-Threads-Output
在Linux下创建(fork)一个子进程,实验wait/exit函数
参考资料: https://www.geeksforgeeks.org/wait-system-call-c/
网址: https://github.com/Abdurraheem/Linux-Child-Process
在Windows或Linux下利用线程实现“生产者-消费者”同步控制
参考资料:
https://www.geeksforgeeks.org/producer-consumer-solution-using-threads-in-java/
网址: https://github.com/Abdurraheem/Producer-Consumer-Problem
在Windows或Linux下模拟哲学家就餐,提供死锁和非死锁解法
参考资料:
https://www.geeksforgeeks.org/dining-philosophers-problem-using-semaphores/
网址:
https://github.com/Abdurraheem/Dining-Philosophers-Problem
研读Linux内核并用printk调试进程创建和调度策略的相关信息
参考资料: https://www.kernel.org/doc/html/latest/
网址: https://github.com/torvalds/linux
《操作系统原理》实验报告(三)
姓名
dekrt
学号
U2021172??
专业班级
软件2102班
时间
2023.04.24
一、实验目的
1)理解页面淘汰算法原理,编写程序演示页面淘汰算法。
2)验证Linux虚拟地址转化为物理地址的机制。
3)理解和验证缺页处理的流程。
二、实验内容
1)Windows/Linux模拟实现FIFO或LRU页面淘汰算法。
2)Linux下利用/proc/pid/pagemap计算某个变量或函数虚拟地址对应的物理地址等信息。建议优麒麟或麒麟系统。
3)研读并修改Linux内核的缺页处理函数do_no_page 或页框分配函数
get_free_page,并用printk打印调试信息。注意:需要编译内核。建议优麒麟或麒麟系统。
三、实验环境和核心代码
3.1 模拟实现FIFO算法
开发环境:windows 11,编辑工具:vscode , 编译工具: gcc
使用C语言模拟实现FIFO页面淘汰算法。
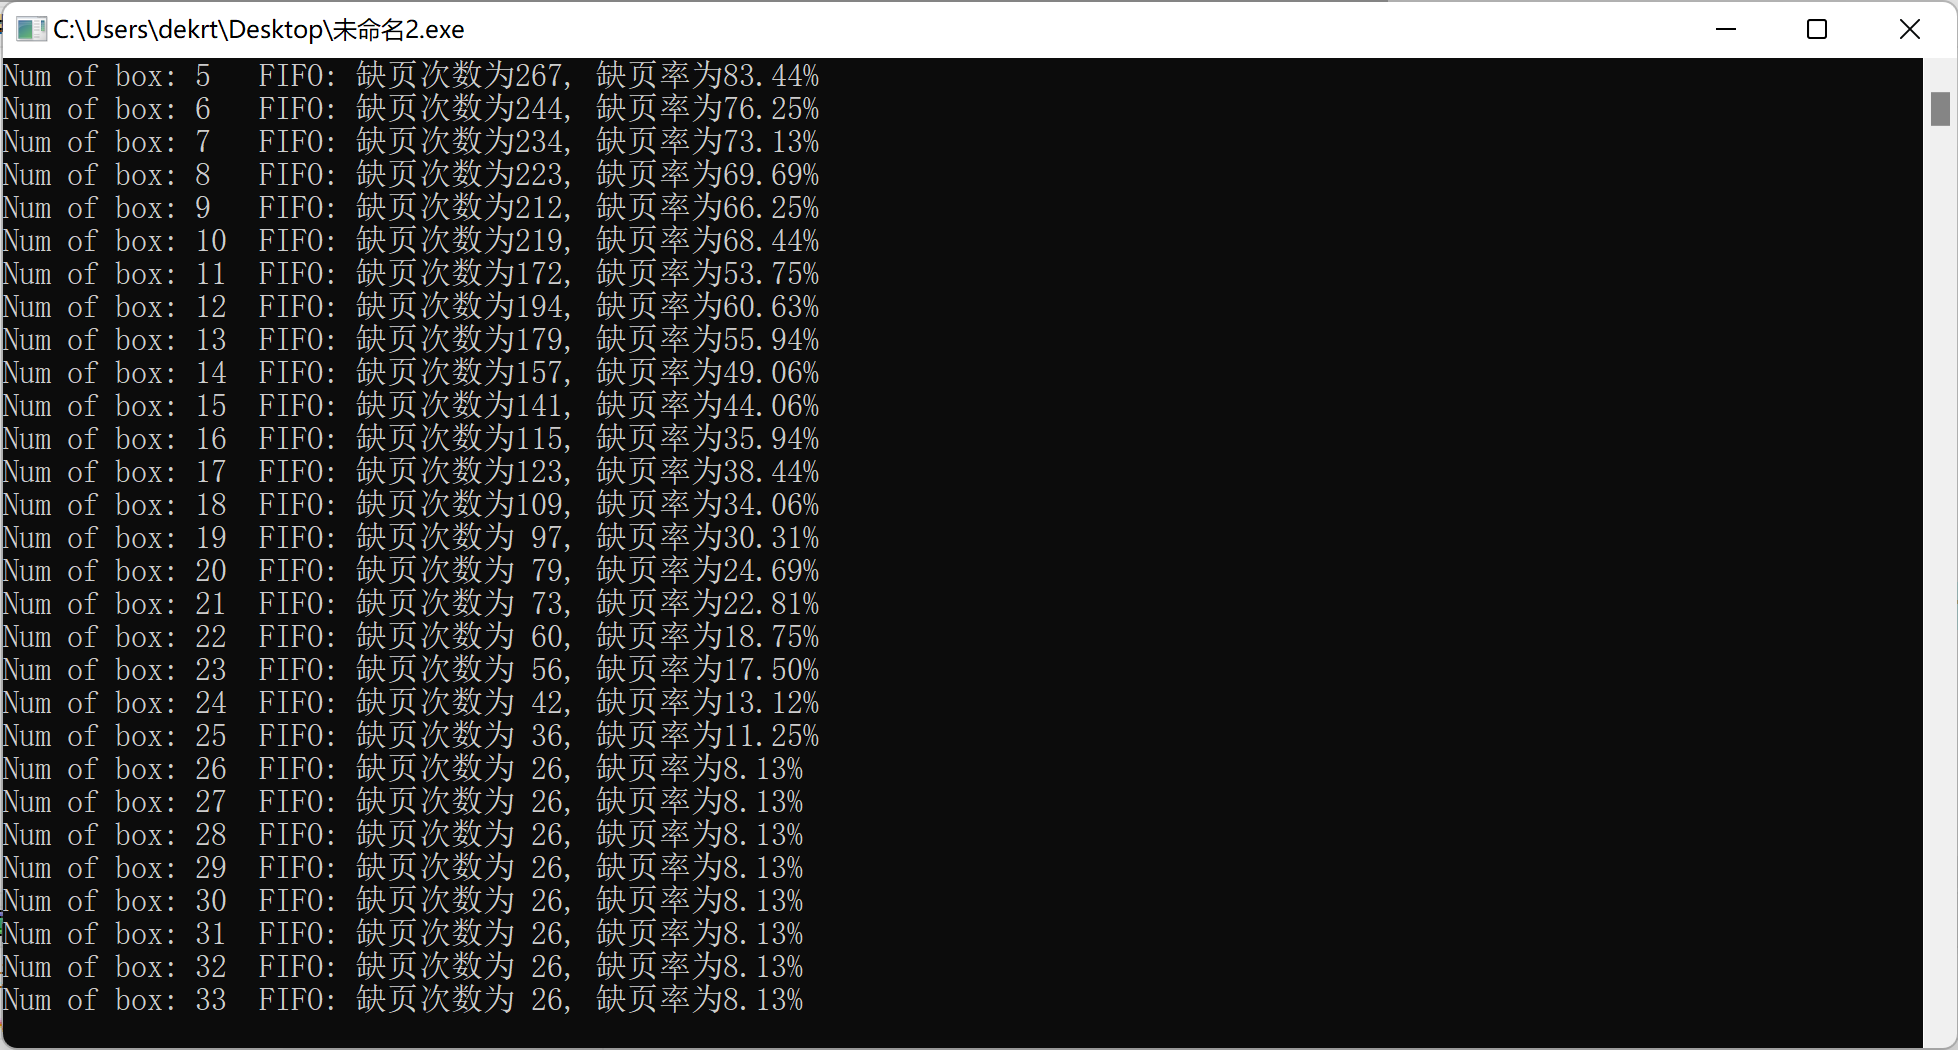
1 2 3 4 5 6 7 8 9 10 11 12 13 14 15 16 17 18 19 20 21 22 23 24 25 26 27 28 29 30 31 32 33 34 35 36 37 38 39 40 41 42 43 44 45 46 47 48 49 50 51 52 53 54 55 56 57 58 59 60 61 62 63 64 65 66 67 68 69 70 #include <stdio.h> #include <time.h> #include <stdlib.h> #include <stdbool.h> #define num_of_command 320 #define max_of_RAM 32 char RAM[max_of_RAM]; int FIFO (char pages[], int pagesNum, int can_use) for (int i = 0 ; i < can_use; i++) { RAM[i] = NULL ; } int count = 0 ; int location = 0 ; for (int i = 0 ; i < pagesNum; i++) { bool flag = true ; for (int j = 0 ; j < can_use; j++) { if (RAM[j] == pages[i]) { flag = false ; break ; } } if (flag == true ) { count++; RAM[location] = pages[i]; location = (location + 1 ) % can_use; } } printf ("FIFO: 缺页次数为%3d, 缺页率为%.2f%%\n" , count, (float )(100 * ((float )count / (float )pagesNum))); return count; } int command[num_of_command];char pages[num_of_command];void initialize () for (int i = 0 ; i < num_of_command; i++) { command[i] = rand () % 260 ; pages[i] = command[i] / 10 + 'A' ; } } int main () int FIFO_count = 0 ; int num_of_box = 4 ; srand ((unsigned )time (NULL )); while (num_of_box++ <= max_of_RAM) { initialize (); printf ("Num of box: %d\t" , num_of_box); FIFO (pages, num_of_command, num_of_box); } return 0 ; }
3.2 利用pagemap计算地址
开发环境:Ubuntu 20.04,内核版本:5.15.67,编辑工具:vim &
gedit
1 2 3 4 5 6 7 8 9 10 11 12 13 14 15 16 17 18 19 20 21 22 23 24 25 26 27 28 29 30 31 32 33 34 35 36 37 38 39 40 41 42 43 44 45 46 47 48 49 50 51 52 53 54 55 56 57 58 59 60 61 62 63 64 65 66 67 68 69 70 71 72 73 74 75 #include <stdio.h> #include <unistd.h> #include <fcntl.h> #include <stdint.h> #include <string.h> void get_VA (unsigned long vaddr) int pid = getpid (); printf (">>> 当前pid: %d\n" , pid); printf (">>> 虚拟地址: %lx\n" , vaddr); printf (">>> 虚拟页号: %lx\n" , vaddr / getpagesize ()); printf (">>> 页内偏移地址:%lx\n" , vaddr % getpagesize ()); unsigned long v_offset = vaddr / getpagesize () * sizeof uint64_t ); uint64_t item = 0 ; int fd = open ("/proc/self/pagemap" , O_RDONLY); if (fd == -1 ) { printf ("open /proc/self/pagemap error\n" ); return ; } if (lseek (fd, v_offset, SEEK_SET) == -1 ) { printf ("sleek errer\n" ); return ; } if (read (fd, &item, sizeof uint64_t )) != sizeof uint64_t )) { printf ("read item error!\n" ); return ; } if ((((uint64_t )1 << 63 ) & item) == 0 ) { printf ("page present is 0\n" ); return ; } uint64_t phy_pageIndex = (((uint64_t )1 << 55 ) - 1 ) & item; printf (">>> 物理页框号:%lx\n" , phy_pageIndex); unsigned long paddr = (phy_pageIndex * getpagesize ()) + vaddr % getpagesize (); printf (">>> 物理地址:%lx\n" , paddr); } const int a = 100 ; int main () int b = 100 ; static int c = 100 ; const int d = 100 ; printf (">>> 页面大小:%x\n" , getpagesize ()); printf ("全局常量:\n" ); get_VA ((unsigned long )&a); printf ("\n局部变量:\n" ); get_VA ((unsigned long )&b); printf ("\n全局静态变量:\n" ); get_VA ((unsigned long )&c); printf ("\n局部常量:\n" ); get_VA ((unsigned long )&d); return 0 ; }
四、实验结果
4.1 模拟实现FIFO算法
image-20230427170901514
4.2 利用pagemap计算地址
2023-04-27 17-15-36屏幕截图
五、实验错误排查和解决方法
5.1 模拟实现FIFO算法
5.1.1 程序报错:identifier
"bool" is undefined:
问题出现的原因是 C 语言中没有 bool 类型 因此,需要在程序中加上头文件
#include<stdbool.h>。
5.2 利用pagemap计算地址
5.2.1
运行程序时发现物理页框号均为0
问题出现的原因是程序的权限不够,应该在可执行文件前加上sudo。
六、实验参考资料和网址
教学课件
操作系统-内存管理实验指导书:https://wenku.baidu.com/view/ffd39261011ca300a6c390ee.html?re=view&wkts =1682560478932
用C++实现LRU算法:
https://blog.csdn.net/z702143700/article/details/48374201
用C++实现FIFO算法:https://blog.csdn.net/weixin_44384477/article/details/109538424
《操作系统原理》实验报告(四)
姓名
dekrt
学号
U2021172??
专业班级
软件2102班
时间
2023.05.07
一、实验目的
1)掌握Linux驱动概念和编程流程,理解设备是文件的概念。
2)掌握Linux下文件读写操作 3)了解索引文件系统和索引节点的概念
二、实验内容
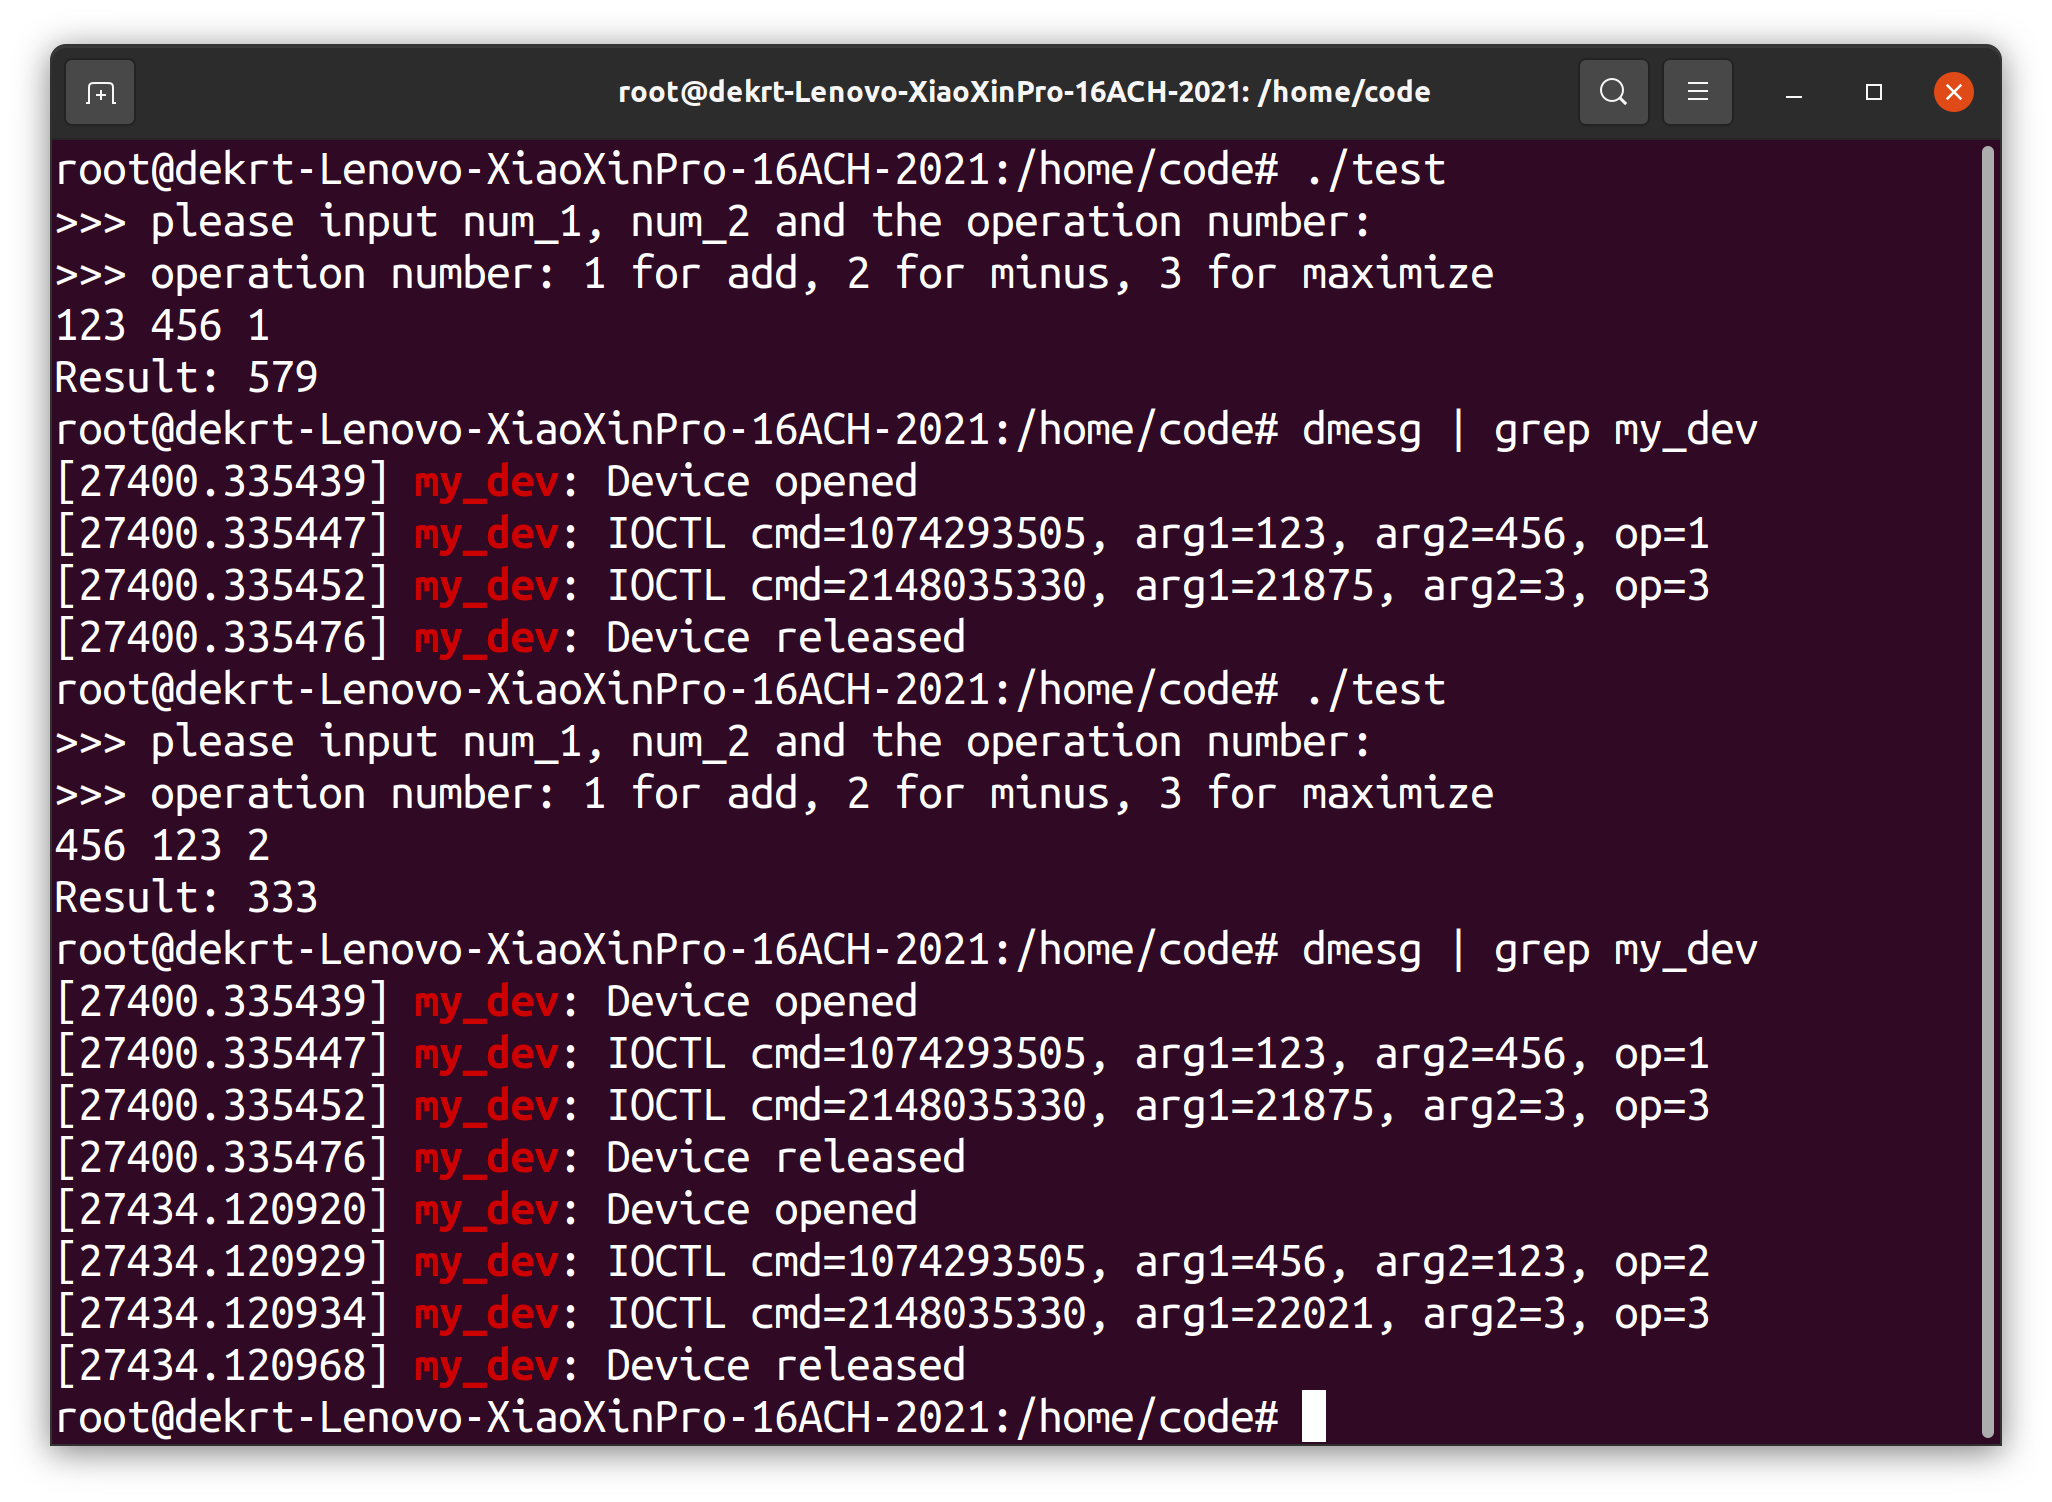
1)编写Linux驱动程序(字符类型或杂项类型)和相应的测试程序。驱动程序的功能:(a)写入一个整数表示设备的状态;
(b)读出设备的状态;(c)输入两个整数和要做的操作的指示码(用1,2,3分别表示求和,求差,求最大值),分别返回和、差和最大值。要求使用IOCTL接口。
2)编写Linux驱动程序(字符类型或杂项类型)和相应的测试程序。测试程序的功能:使用open函数先后打开该设备和25个文本文件(自己编造2 5个文本文件)。驱动程序的功能:打印测试程序进程PCB的成员信息,越多越好,其中必须包括:内核版本,进程ID,程序名,打开的文件列表,占用内存信息等。
3)编造若干大小不等的文本文件并创建它们的软链接和硬链接,自己设计各种验证过程,感性认识inode索引节点和索引文件系统。
三、实验环境和核心代码
3.1 编写Linux驱动及测试程序
开发环境:Ubuntu 20.04,内核版本:5.15.71,编辑工具:vim &
vscode,编译器:gcc
3.1.1 驱动程序代码:
1 2 3 4 5 6 7 8 9 10 11 12 13 14 15 16 17 18 19 20 21 22 23 24 25 26 27 28 29 30 31 32 33 34 35 36 37 38 39 40 41 42 43 44 45 46 47 48 49 50 51 52 53 54 55 56 57 58 59 60 61 62 63 64 65 66 67 68 69 70 71 72 73 74 75 76 77 78 79 80 81 82 83 84 85 86 87 88 89 90 91 92 93 94 95 96 97 98 99 100 101 102 103 104 105 106 107 108 109 110 111 112 113 114 115 116 117 118 119 120 121 122 123 124 125 126 127 128 129 130 131 132 133 134 135 136 137 138 139 140 141 142 143 144 145 146 147 148 149 150 151 152 153 154 155 156 #include <linux/module.h> #include <linux/fs.h> #include <linux/cdev.h> #include <linux/uaccess.h> #include <linux/ioctl.h> #define DEV_NAME "my_dev" #define MAGIC_NUM 'k' #define IOCTL_SET_ARGS _IOW(MAGIC_NUM, 1, int *) #define IOCTL_GET_RESULT _IOR(MAGIC_NUM, 2, int *) static dev_t dev;static struct cdev cdev ;static int state;static int my_open (struct inode *inode, struct file *file) printk(KERN_INFO "my_dev: Device opened\n" ); return 0 ; } static int my_release (struct inode *inode, struct file *file) printk(KERN_INFO "my_dev: Device released\n" ); return 0 ; } static ssize_t my_write (struct file *file, const char __user *buf, size_t count, loff_t *ppos) int ret; if (count != sizeof (int )) { return -EINVAL; } ret = copy_from_user(&state, buf, count); if (ret) { return -EFAULT; } printk(KERN_INFO "my_dev: State set to %d\n" , state); return count; } static ssize_t my_read (struct file *file, char __user *buf, size_t count, loff_t *ppos) int ret; if (count != sizeof (int )) { return -EINVAL; } ret = copy_to_user(buf, &state, count); if (ret) { return -EFAULT; } printk(KERN_INFO "my_dev: State read as %d\n" , state); return count; } static long my_ioctl (struct file *file, unsigned int cmd, unsigned long arg) int args[3 ], ret; int op_code = (cmd == IOCTL_SET_ARGS) ? 1 : 2 ; switch (cmd) { case IOCTL_SET_ARGS: case IOCTL_GET_RESULT: ret = copy_from_user(args, (void __user *)arg, sizeof (args)); if (ret) { return -EFAULT; } printk(KERN_INFO "my_dev: IOCTL cmd=%u, arg1=%d, arg2=%d, op=%d\n" , cmd, args[0 ], args[1 ], args[2 ]); break ; default : return -ENOTTY; } switch (op_code) { case 1 : switch (args[2 ]) { case 1 : state = args[0 ] + args[1 ]; break ; case 2 : state = args[0 ] - args[1 ]; break ; case 3 : state = (args[0 ] > args[1 ]) ? args[0 ] : args[1 ]; break ; default : return -EINVAL; } break ; case 2 : ret = copy_to_user((void __user *)arg, &state, sizeof (state)); if (ret) { return -EFAULT; } break ; } return 0 ; } static struct file_operations my_fops = .owner = THIS_MODULE, .open = my_open, .release = my_release, .write = my_write, .read = my_read, .unlocked_ioctl = my_ioctl, }; static int __init my_init (void ) int ret; ret = alloc_chrdev_region(&dev, 0 , 1 , DEV_NAME); if (ret < 0 ) { printk(KERN_ERR "my_dev: Failed to allocate chrdev region\n" ); return ret; } cdev_init(&cdev, &my_fops); cdev.owner = THIS_MODULE; ret = cdev_add(&cdev, dev, 1 ); if (ret < 0 ) { printk(KERN_ERR "my_dev: Failed to add cdev\n" ); unregister_chrdev_region(dev, 1 ); return ret; } printk(KERN_INFO "my_dev: Initialized\n" ); return 0 ; } static void __exit my_exit (void ) cdev_del(&cdev); unregister_chrdev_region(dev, 1 ); printk(KERN_INFO "my_dev: Exited\n" ); } module_exit(my_exit); MODULE_LICENSE("GPL" ); MODULE_AUTHOR("dekrt" ); MODULE_DESCRIPTION("A simple character driver for testing ioctl" );
3.1.2 测试程序代码:
1 2 3 4 5 6 7 8 9 10 11 12 13 14 15 16 17 18 19 20 21 22 23 24 25 26 27 28 29 30 31 32 33 34 35 36 37 38 39 40 41 42 43 44 45 46 47 48 49 50 #include <stdio.h> #include <stdlib.h> #include <unistd.h> #include <fcntl.h> #include <sys/ioctl.h> #define DEV_PATH "/dev/my_dev" #define IOCTL_MAGIC 'k' #define IOCTL_SET_ARGS _IOW(IOCTL_MAGIC, 1, int *) #define IOCTL_GET_RESULT _IOR(IOCTL_MAGIC, 2, int *) int main (int argc, char *argv[]) int fd, ret, args[3 ], result; puts (">>> please input num_1, num_2 and the operation number:" ); puts (">>> operation number: 1 for add, 2 for minus, 3 for maximize" ); for (int i = 0 ; i < 3 ; i++) { scanf ("%d" , &args[i]); } fd = open(DEV_PATH, O_RDWR); if (fd < 0 ) { perror("open" ); exit (EXIT_FAILURE); } ret = ioctl(fd, IOCTL_SET_ARGS, args); if (ret < 0 ) { perror("ioctl set args" ); goto error; } ret = ioctl(fd, IOCTL_GET_RESULT, &result); if (ret < 0 ) { perror("ioctl get result" ); goto error; } printf ("Result: %d\n" , result); close(fd); exit (EXIT_SUCCESS); error: close(fd); exit (EXIT_FAILURE); }
3.1.3 Makefile
1 2 3 4 5 6 7 8 9 10 obj-m += my_dev.o all: make -C /lib/modules/$(shell uname -r) /build M=$(PWD) modules gcc -Wall -o test test.c clean: make -C /lib/modules/$(shell uname -r) /build M=$(PWD) clean rm -f test
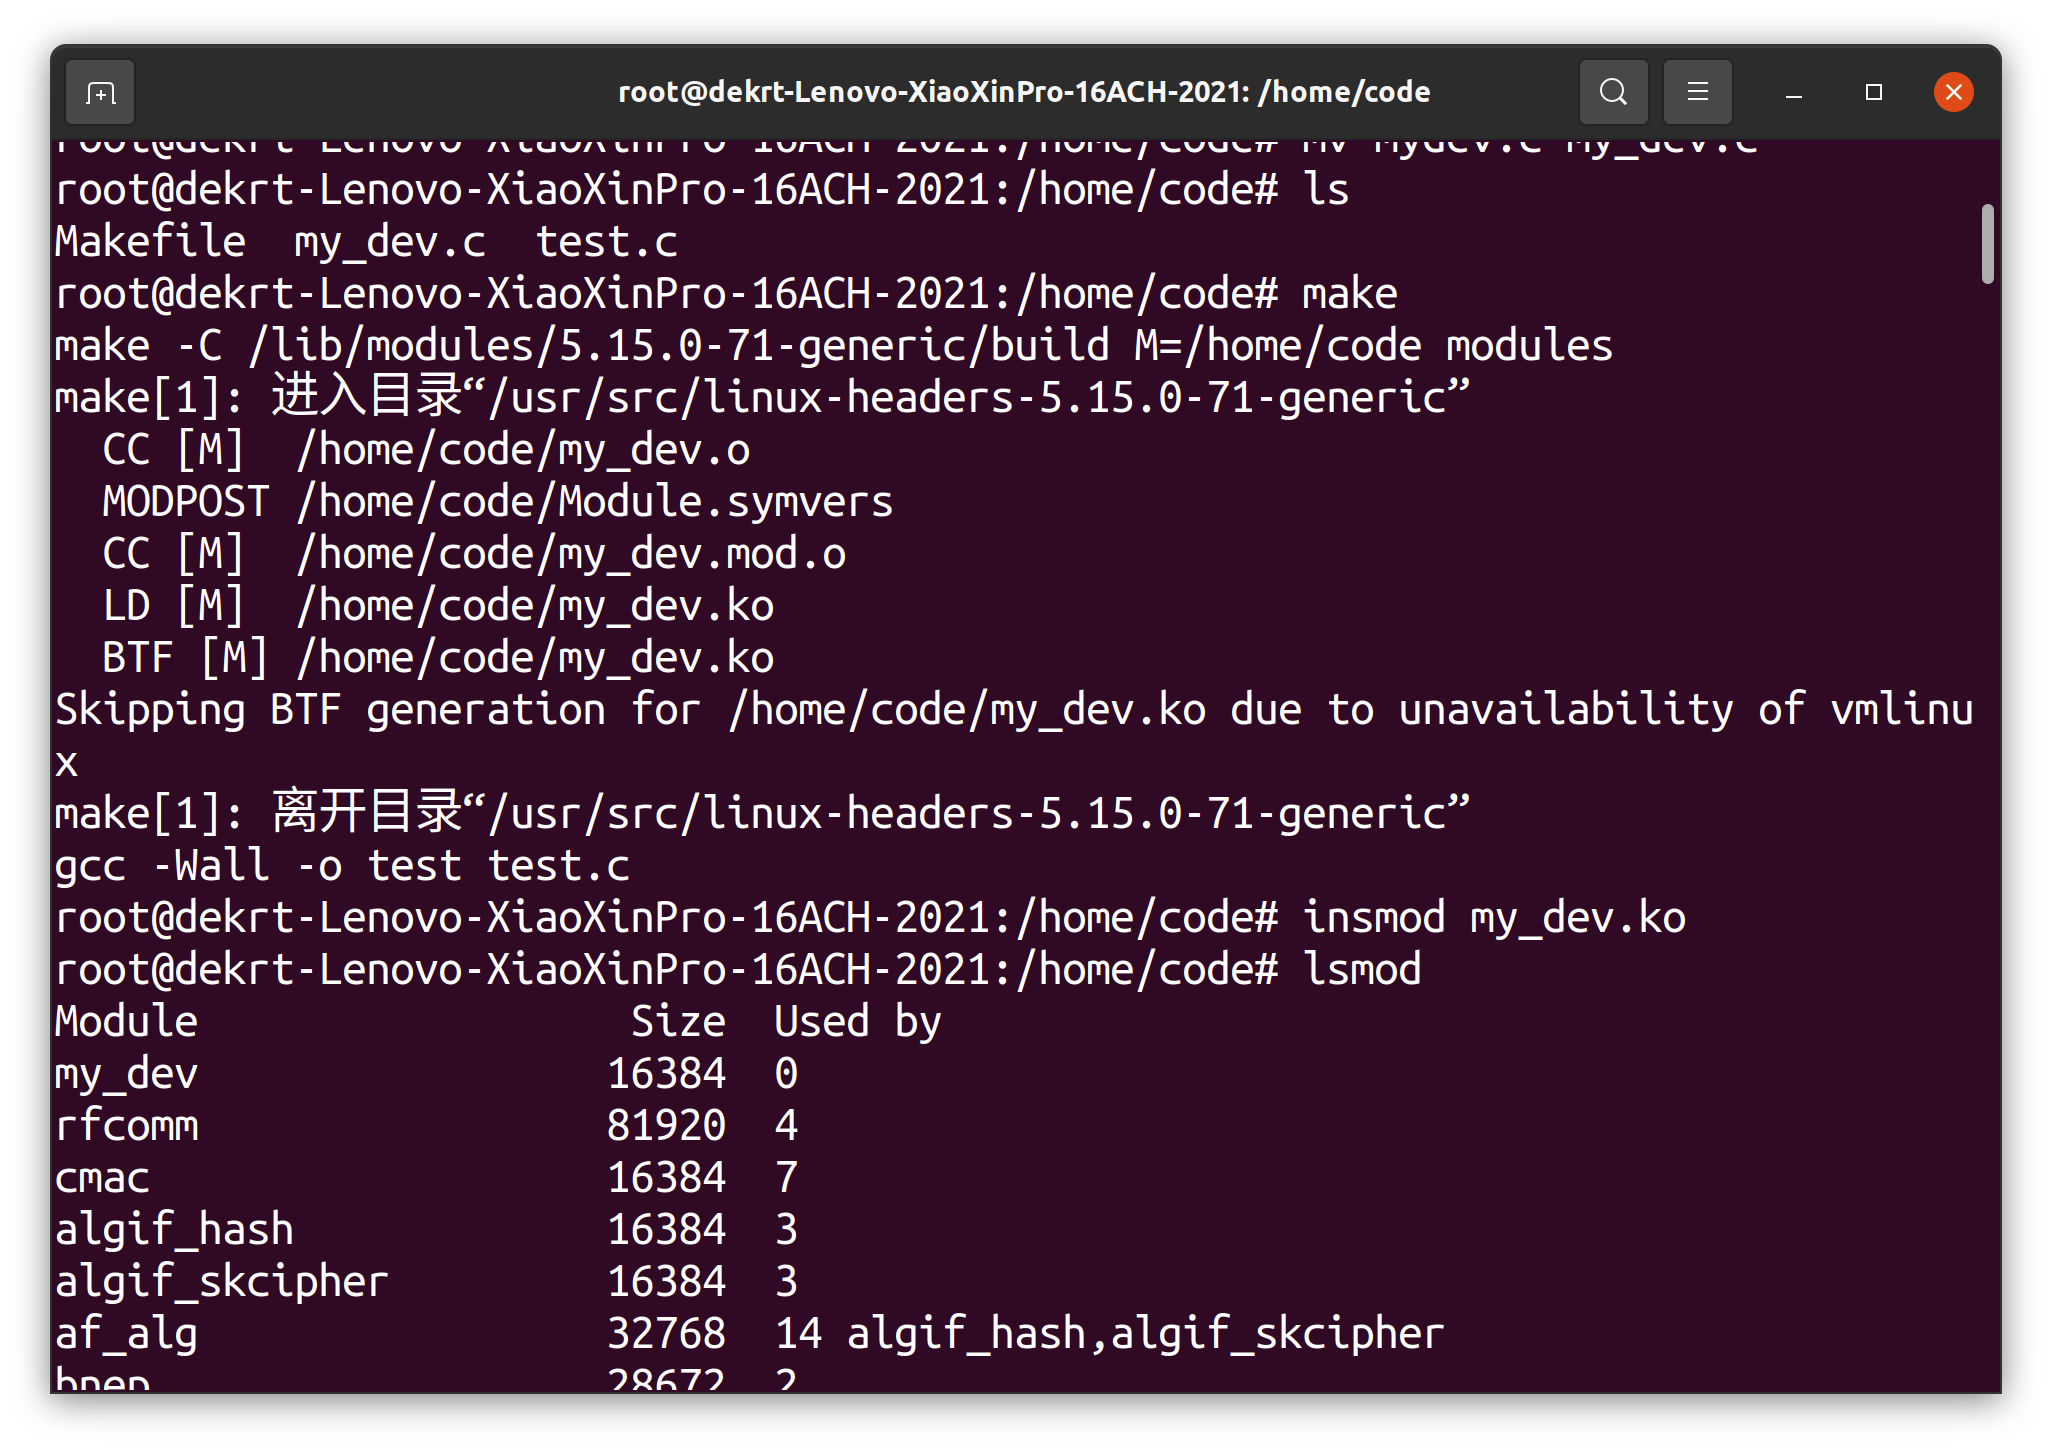
3.1.4 安装过程
使用sudo su命令进入root模式,在代码目录使用make命令进行编译,编译完成后使用insmod my_dev.ko命令安装编译好的模块:
image-20230507235059842
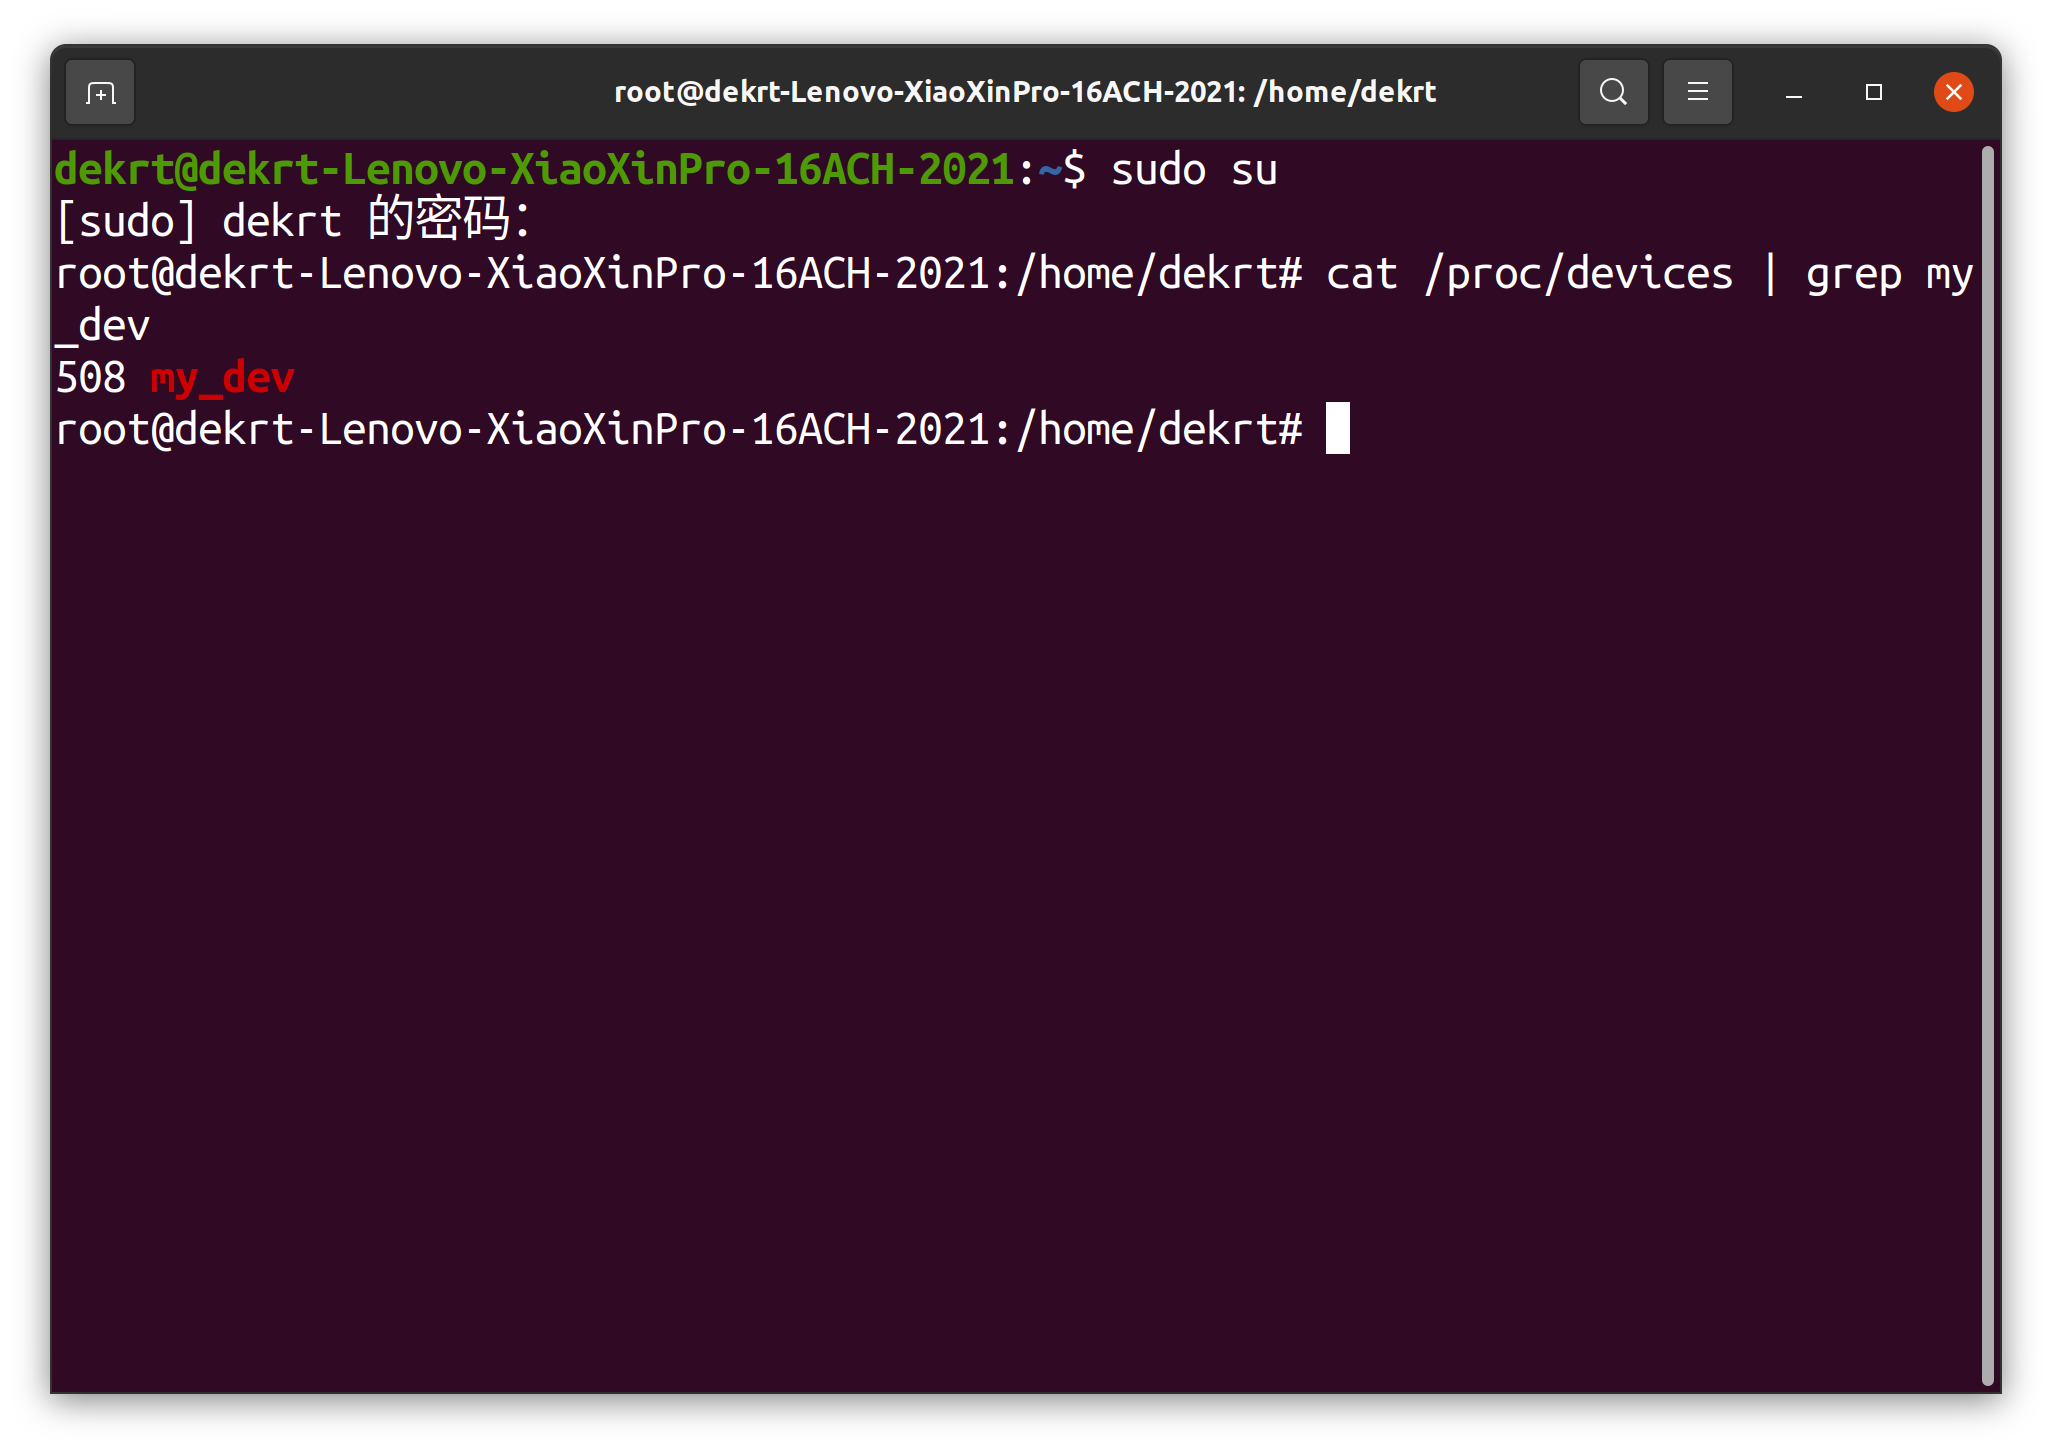
使用lsmod命令,可以看到my_dev模块被成功安装。再使用cat /proc/devices命令查看设备调用的的设备号,可以看到my_dev的设备号是508
image-20230507235628170
使用mknod /dev/my_dev c 508 0命令创建相应设备,使用ll命令验证设备创建成功。
image-20230507235817552
运行测试程序,可以发现其成功运行
image-20230508000030613
3.2 Linux下创建软连接与硬连接
开发环境:Ubuntu 20.04,内核版本:5.15.71,编辑工具:vim &
Vscode
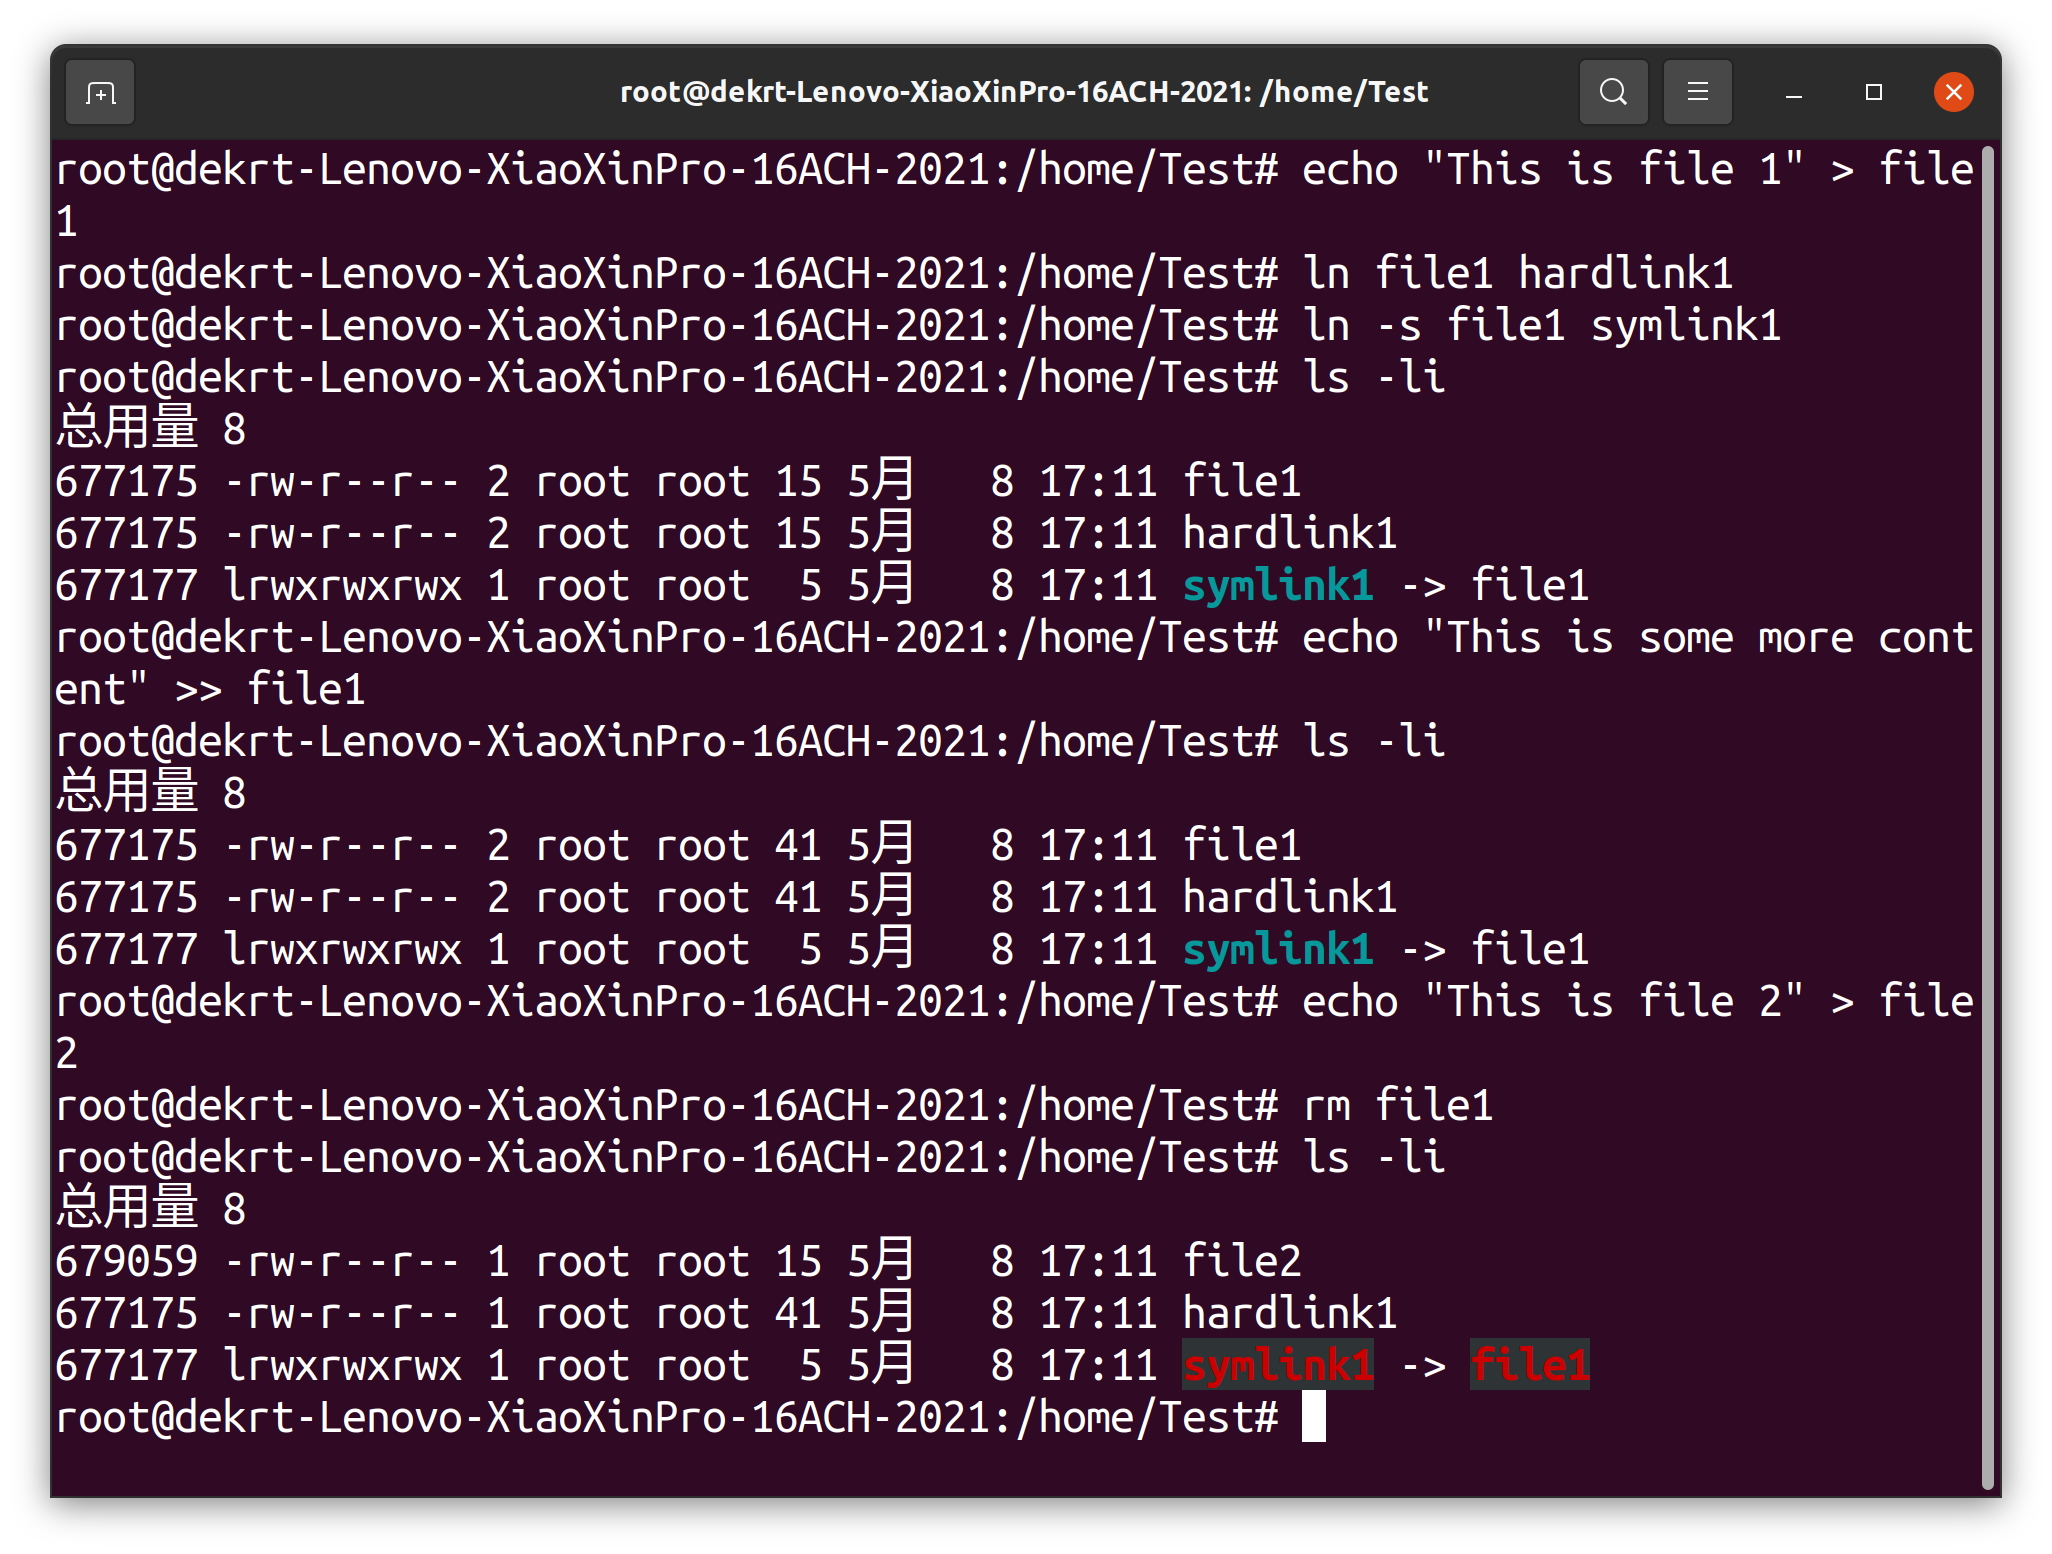
首先在命令行中创建一个名为"Test"的目录:
进入"Test"目录,使用以下命令创建一个名为"file1"的文件,并写入一些内容:
1 2 cd Testecho "This is file 1" > file1
使用以下命令创建一个名为"hardlink1"的硬链接:
以下命令创建一个名为"symlink1"的软链接:
用以下命令查看"file1"、"hardlink1"和"symlink1"的详细信息:
这个命令会输出包含文件索引节点号(inode)的列表,以及每个文件的权限、链接数、所有者和大小等信息。我们可以发现,"file1"、"hardlink1"和"symlink1"的inode号是一样的,说明它们都指向同一个数据块。
接下来,我们尝试在"file1"中添加一些内容,然后再次查看这三个文件的信息:
1 2 echo "This is some more content" >> file1ls -li
现在我们会发现,三个文件的大小都增加了,并且它们的inode号仍然相同。
接着,我们使用以下命令创建一个名为"file2"的新文件:
1 echo "This is file 2" > file2
然后,我们使用以下命令删除"file1":
最后,我们再次查看"hardlink1"和"symlink1"的详细信息:
我们会发现,"hardlink1"仍然存在,而"symlink1"则已经无法找到目标文件,因为它是指向"file1"的软链接,而"file1"已经被删除了。
通过这个实验,我们可以感性认识索引文件和索引节点的概念。在Linux中,每个文件都有一个唯一的inode号,它包含了文件的元数据(如文件所有者、文件权限、文件大小等)以及指向数据块的指针。当我们创建一个硬链接时,实际上是在文件系统中创建了一个新的目录项,它指向相同的inode。这个新的目录项与原始文件目录项没有区别,它们是等价的。而软链接则是一个特殊的文件,它包含了指向目标文件的路径,当我们访问软链接时,实际上是通过路径找到了目标文件。
image-20230508171201762
四、实验结果
4.1 编写Linux驱动及测试程序
运行测试程序,可以发现其成功运行
image-20230508000030613
4.2 Linux下创建软连接与硬连接
image-20230508171214021
五、实验错误排查和解决方法
5.1 编写Linux驱动及测试程序
错误1:注册设备后/dev
下没有对应的节点文件
字符设备注册函数不会自动创建设备节点文件,需要使用 mknod
命令手动创建,或者使用相关 API
函数(⻅三)。使用杂项设备的方式来注册可以避免这个复杂的过程。
错误2:测试程序无法打开设备文件/测试程序执行结果不正确
测试程序没有访问设备的权限
很多同学都会遇到这个问题。使用超级用户权限来执行测试程序:
六、实验参考资料和网址
教学课件
Google
Stackoverflow
CSDN
操作系统原理课程设计报告
懒得转markdown了,直接把pdf丢上来吧,用电脑可以正常查看pdf


 wechat
 alipay